Search this blog

Showing posts with label mousse. Show all posts

Thursday, July 26, 2012

French Food

After our fabulous honeymoon in France, I was inspired to make a french meal.  All the food we had there was so great.  I don't think mine was quite as good as the real thing, but a good imposter. 
Drink...
Bordeaux Wine
With France having such great wines, we were sure to stock up our wine fridge with some of the delicious wines we brought back.  We couldn't believe how inexpensive the quality wines were in France.  We saw the majority of bottles on sale for 3-5 Euros per bottle.  We enjoyed many different wines in France in cafes, brasseries, and on our picnics.  
There's no ingredients or directions for this one.  Just get a good bottle, open, pour, and enjoy!

Dinner...
Boeuf Bourguignon
We wanted to have this dish in France, but never got the opportunity to.  I looked up several different recipes and created a combination of them.  One of the recipes I included portions of was Julia Child's.  However, hers seemed very complicated, took a long time, and had to be cooked in the oven.  So, I combined some ideas from her recipe with another quicker, more streamlined recipe I found.  This one was much simpler, quicker, and cooked on the stove top (which was great because our apartment is already way too hot without the oven on!). 
Ingredients:
(serves 4-5)
  • 6 oz. bacon, chopped
  • 1 beef sirloin steak or top round steak, cut into 1-inch pieces (about 1 pound)
  • 1/4 cup all-purpose flour
  • 1 medium onion, chopped (about 1/2 cup)
  • 2 cloves of garlic, minced
  • 1/9 teaspoon dried parsley flakes
  • 1/4 teaspoon ground black pepper
  • 6 ounce sliced mushrooms (about 2 cups)
  • 1 teaspoon dried thyme leaves , crushed
  • 2 cup fresh or frozen whole baby carrots
  • 1 3/4 cup beef broth
  • 1/2 cup Burgundy or other dry red wine

Directions:

cooked bacon and beef
veggies cooking
  1. Simmer the bacon in a large pot or dutch oven until fully cooked.  Remove from the pot.
  2. Sprinkle the beef with salt and pepper.  Coat the pieces with flour.  Cook the beef in the bacon fat until well browned. Remove from the pot.
  3. Cook the carrots, onions, garlic, mushrooms, parsley, thyme, and black pepper in the bacon fat.
  4. Add the beef stock, wine, cooked beef, and cooked bacon.  
  5. Simmer covered for 20 minutes.  If the broth seems too thin, add a little flour and cook a few more minutes.
  6. Serve with potatoes, rice, or orzo pasta.
Plat Du Fromage
My favorite food in France was the cheese, and we ate a lot of it!  We even brought some back with us.  The French eat their cheese course at the end of their meal.  We had it this way in France, but I still prefer it before my meal.  I guess I'm just too American!  
For this cheese platter we had a Camembert and another cheese which we aren't quite sure what it was (maybe it was called Auvergne since it says that on the tag??).  The person we bought it from in France didn't speak much English.  We couldn't bring back goat cheese because it was unpasteurized, so he recommended this cheese as a similar one.  
You could have a cheese plate with any variety of cheeses, but typically the ones we had in France included a Brie or Camembert, a goat cheese, a blue cheese, and a hard cheese.

Dessert...
Mousse Au Chocolat
*recipe from FoodNetwork.com
Chocolate mousse has been one of my favorite desserts since I was a kid. Most recipes either have raw egg, or involve using a thermometer to measure the egg temperature.  This was a bit complicated for me, so I went with Alton Brown's simplified recipe.  It tasted delicious, but my texture seemed to be a little off.  I think I might have over beat my whipped cream which caused it to be too stiff and not incorporate smoothly, so be careful not to over-whip!
Ingredients:
(serves 6)
  • 1 3/4 cups whipping cream
  • 12 ounces quality semi-sweet chocolate chips
  • 3 ounces espresso or strong coffee
  • 1 tablespoon dark rum
  • 4 tablespoons butter
  • 1 teaspoon flavorless, granulated gelatin
Directions:

  1. Chill 1 1/2 cups whipping cream in refrigerator. Chill metal mixing bowl and mixer beaters in freezer.
  2. In top of a double boiler, combine chocolate chips, coffee, rum and butter. Melt over barely simmering water, stirring constantly. Remove from heat while a couple of chunks are still visible. Cool, stirring occasionally to just above body temperature.
  3. Pour remaining 1/4 cup whipping cream into a metal measuring cup and sprinkle in the gelatin. Allow gelatin to "bloom" for 10 minutes. Then carefully heat by swirling the measuring cup over a low gas flame or candle. Do not boil or gelatin will be damaged. Stir mixture into the cooled chocolate and set aside.
  4. In the chilled mixing bowl, beat cream to medium peaks. Stir 1/4 of the whipped cream into the chocolate mixture to lighten it. Fold in the remaining whipped cream in two doses. There may be streaks of whipped cream in the chocolate and that is fine. Do not over work the mousse.
  5. Spoon into bowls or martini glasses and chill for at least 1 hour. Garnish with fruit and serve.
  6. (If mousses are to be refrigerated overnight, chill for one hour and then cover each with plastic wrap)


Wednesday, June 6, 2012

Healthy & Hearty

Since my wedding is coming up, I am trying to go into super-healthy mode.  However, even though I am trying to eat less and eat healthier, I hate feeling hungry.  I find that a lot of health foods just don't fill me up.  This meal is an exception.  It was not only healthy, but is very low carb and full of fresh ingredients.  And, it filled me up!  I would make these recipes again, even if I wasn't on a diet :)


Drink...
Tom Collins
I scoured the internet for a low calorie mixed drink.  Let me tell you, they are not easy to find.  Most of the mixed drinks available have a ton of sugar in them, which is precisely what I am trying to avoid.  The mixed drinks I found that didn't have a lot of sugar sounded gross, as they were mostly just straight alcohol or liqueur mixed with water—blah!  Finally, I found one.  It has artificial sweetener in it, which I know some people do not like.  But, I have been using Stevia extract lately.  I think it's a good replacement for sugar because it has no calories and is made from a plant extract, so it isn't full of chemicals.  I am not the biggest gin fan, but this drink was delicious and refreshing.  Plus, based on my calculations it only has 115 calories and no sugar (the only ingredients with calories are the gin and lemon juice).

Ingredients:
•1.5 (3tbsp)oz gin
•1 oz (2tbsp) lemon juice, or more to taste
•1 packet of Splenda or Equal (*I used Stevia*)
•Club soda
•Lemon slice for garnish


Directions:
  1. Mix gin, lemon juice, and sweetener in a glass. 
  2. Add club soda to taste, and then add ice cubes. 
  3. Garnish with lemon slices.
Dinner...
Paleasagna 
*recipe from What Runs Lori
I am obsessed with goat cheese, so when I saw the ingredients included it, I was ready to make it.  When I saw the recipe, I was wondering how it got it's name.  In case you are like me, and have never heard of the Paleolithic Diet (Paleo Diet), you might be wondering the same thing.  According to Wikipedia, this diet is also referred to as the Caveman Diet or the Hunter-Gatherer Diet.  It is based on the idea that humans are genetically adapted to the diet of their Paleolithic ancestors, and we would be healthier if we ate their diet.  The diet consists mainly of fish, grass-fed pasture-raised meats, vegetables, fruits, and nuts.  It excludes grains, legumes, dairy products, salt, refined sugar, and processed oils.  I don't know that I agree with this diet and this recipe doesn't conform to it exactly, but I do think it's good to eat fresh foods, low sugar, and low carbs, which this recipe has.  Besides the healthiness, it was quite delicious, filling, and easy to make.  My only suggestion is to add more seasoning than the recipe suggests, because I found it a bit bland.
Ingredients:
(makes 5-6 servings)
  • 1/2 white onion, diced
  • 1/2 pound of extra lean turkey, or ground sirloin
  • 1 15oz can diced tomatoes, low sodium
  • 3 tbsp tomato paste
  • 3 tbsp Italian spice blend (*I would add more*)
  • 1 tsp salt
  • 1/2 tsp pepper
  • 2 cloves garlic, crushed
  • 1 pound of zucchini and/or yellow squash, cut into medallion rounds
  • 1/2 cup raw goat cheese, shredded
  • 1 cups Greek yogurt
  • 1 head broccoli, roughly chopped (*I used eggplant since Doug doesn't like broccoli and it was delicious*)
  • 1 egg
Directions:
  1. In a large skillet or sauce pan, heat 1 tablespoon of olive oil and add the diced onions. Sauté on medium-high until softened, about 3-5 minutes. 
  2. Add the ground turkey, canned tomato and tomato paste, spices, salt, pepper, and crushed garlic. Continue to cook all ingredients until the turkey is cooked through. Set aside when done.
  3. In a medium bowl, combine raw goat cheese, Greek yogurt, broccoli (*eggplant*) pieces, and egg. Mix well.
eggplant mixture
  4.  Preheat oven to 375 degrees. Lightly grease the bottom of a 13 x 9 Pyrex glass baking dish. Place a layer of zucchini and squash rounds evenly across the bottom, making a sort of liner.
squash & zucchini
   5.  Add a layer of turkey-tomato sauce on top of the zucchini.
meat & tomato layer
  6.  Top that with some of the broccoli and yogurt mixture. 
eggplant, cheese, and yogurt layer
  7.  Continue with this layering process until you have used all of your ingredients.  Top the entire dish with more shredded goat cheese, if desired.
Final Product!
  8.  Bake for 45 to 60 minutes. Remove from oven and allow to sit for 10 minutes before serving.

Dessert...
Chocolate-Coconut Mousse
I cannot feel satisfied after a meal until I have dessert.  So, no matter how healthy I am trying to be, dessert is always included.  This dessert is a surprising twist on chocolate mousse and is sugar free! It has a strong coconut flavor, so liking coconut is a must for this one.  I found that it was even better after I left it in a bowl uncovered in the fridge overnight because it got thicker and was more of a mousse texture.  
To make it, you have to use thickened coconut milk.  This is a recent trick I learned, and I am still amazed by it (although it didn't work as well for me as expected).  If you put an unopened can of coconut milk in the fridge overnight, the water will separate from it and you will be left with a very thick coconut milk that can be whipped with other ingredients to make things like mousse or whipped cream.  Simply amazing!
Ingredients:
  • 1 can coconut milk
  • 1/4 cup plus 1 T cocoa powder
  • 1/2 tsp pure vanilla extract
  • sweetener to taste (I used a little stevia, but any dry sweetener will do.)
Directions:
  1. Leave the can of coconut milk in the fridge overnight. (Don’t shake the can before opening.) It should get very, very thick. (If it doesn’t, you’ve gotten a bad can that won’t work for the recipe. I highly recommend Thai Kitchen, or especially Thai Kitchen Organic.) (*My first attempt at this failed.  I think it was because I poured it into a bowl and left it in the fridge.  For the second attempt, which worked much better, I left the can unopened in the fridge and tried the Thai Kitchen brand.  It worked much better.*)
 
1st attempt - fail :(
2nd attempt - success!
  2.  Once thick, transfer to a bowl  (leave out the watery bit at the bottom of the can) and whip in your cocoa, vanilla, and sweetener with a whisk, or even beaters if you want to be fancy.  
  3.  Stored uncovered in the fridge, the mixture gets even thicker.

Monday, February 27, 2012

My Big Secret

Alright, I have a secret to confess . . .
In most places, this secret would not be a big deal at all, but here in Manhattan, I risk becoming an outcast in all my social circles.
For the sake of this blog, I will let my secret out.  Here it is:
I like Olive Garden.
There, it's out.  That wasn't so bad.  I know there are others out there like me, so maybe this will make it easier for them to come clean.  Then, once more people admit it, maybe we could all go out to dinner at Olive Garden to celebrate!
No one in NYC eats at a chain restaurant unless it is a small, NYC only chain, or they are tourists.  So, if you are still too scared to admit your love for chain restaurant food, now you can make it home and eat it secretly in your apartment.
Drink...
Raspberry Lemonade
*recipe from My Baking Addiction
When I go to Olive Garden, I don't typically drink alcoholic beverages (maybe since I haven't been there much since I was old enough to drink).  Usually I order raspberry lemonade.  Their raspberry lemonade is nothing spectacular, and in fact, after doing a little web research, I think theirs is really just Minute Maid raspberry lemonade.  So, I made my own and I think it's even better than Olive Garden's. 
Ingredients:
(makes a pitcher of lemonade)
  • 1 cup sugar
  • 1 cup of water
  • ¾ cup raspberries; pureed and pushed through a fine mesh sieve; plus more whole berries for garnish if desired
  • 1 cup fresh lemon juice (this equaled close to 8 of my lemons)
  • 4-6 cups cold water (this will vary depending on your taste)
Directions:
  1. Make a simple syrup by combining the sugar with 1 cup of water in a saucepan. Place over medium heat and heat until the sugar in completely dissolved; swirl the pan occasionally. Let cool.
  2. Measure 3/4 of fresh raspberries and puree them in your blender or food processor. (I don't have a blender or a food processor, so I just mashed them up with a fork and it worked surprisingly well)
  3. Push the raspberry puree through a fine mesh sieve to separate the seeds from the pulp.
  4. Once the simple syrup has cooled, combine the raspberry puree, simple syrup and lemon juice in a large pitcher.
  5. Add 4-6 cups of cold water. The amount of water you use will depend on your taste, so add as little or as much as you want to achieve your perfect sweet/tart balance. 
Dinner...
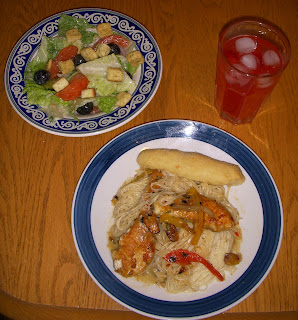
Chicken Scampi with Salad and Breadsticks
This meal was really good.  However, I will say, it was one of the more difficult meals I have made on my blog so far.  The chicken dish is a little involved, but more than anything, it was hard to make all aspects of the meal and have everything ready at the same time.  Those Olive Garden cooks must be good :)

Olive Garden Salad
*recipe from Heritage School House
There is something irresistible about Olive Garden's salad.  I have even made their salad the main part of my meal before by only ordering soup, salad, and breadsticks.  This recipe is not exactly the same, but it's close enough.  I'm pretty excited to be able to make it at home and it's easy!
Ingredients:
(serves 6)
for dressing
  • 1/2 cup mayonnaise
  • 1/3 cup white vinegar
  • 1 teaspoon vegetable oil
  • 2 tablespoons corn syrup
  • 2 tablespoons parmesan cheese
  • 2 tablespoons romano cheese
  • 1/4 teaspoon garlic salt
  • 1/2 teaspoon italian seasoning
  • 1/2 teaspoon parsley flakes
  • 1 tablespoon lemon juice
for salad
  • American blend bagged salad mix
  • red onion slices
  • black olives
  • pepperoncini peppers
  • croutons
  • roma tomatoes, sliced
  • parmesan cheese, freshly grated
Directions:
  1. Mix all dressing ingredients in a blender or processor until well blended. 
  2. Toss salad ingredients and top with dressing.
Olive Garden Breadsticks
 *recipe from Full Bellies, Happy Kids
Even people who say they don't like Olive Garden often will admit, "Well, they do have really good breadsticks."  I know, you're thinking, but Megan . . . you said you would never make bread again!  Well, it seems like that's one of those things that I will keep saying, but not actually do.  There are just so many good bread recipes out there, I can't pass them up!  This was one of my more successful bread attempts.  Doug enjoyed the breadsticks much more than I did, but they were pretty good.  The flavor was consistent with Olive Garden, but the texture was off (mine were a little too dense - not light and fluffy).  
Ingredients:
(makes 10-12 breadsticks)
  • 1 1/2 cups warm water (between 110 - 120 degrees F)
  • 1 package active dry yeast
  • 4 1/4 cups all-purpose flour
  • 2 tablespoons unsalted butter, melted
  • 2 tablespoons sugar
  • 1 tablespoon salt 
For basting:
  • 1 stick unsalted butter (or 1/2 cup margarine)
  • 2 teaspoons garlic powder
  • 2 teaspoons salt
Directions:
  1. In a large bowl, dissolve sugar and yeast in warm water and allow to sit for 10 minutes, covered. Mixture should be frothy.
  2. In separate bowl, combine flour and salt.  
  3. Add flour and salt to yeast mixture. Add melted butter. Mix with paddle attachment of stand mixer or wooden spoon until fully combined. 
  4. Knead dough for a few minutes just until dough is smooth. Do not over-knead!
  5.  Grease a cookie sheet. Pull off pieces of dough and roll out into strips. 
  6. Cover the dough and let sit in a warm place for 45 minutes to an hour.
  7. Preheat your oven to 400 degrees F and once heated, pop in the bread sticks. In microwave, combine the basting ingredients.
  8. After 6 or 7 minutes in the oven, brush the bread sticks with half the butter mixture. 
  9. Then continue to bake. Honestly, I almost never leave them in there for an entire 15 minutes—normally it's closer to 12 because I like them softer and less crisp on the outside, but to each their own. Either way, immediately upon removal from the oven brush the other half of the butter on the breadsticks.
  10. Allow them to cool for a minute or two, and enjoy!    
Chicken Scampi
*recipe from Easy Restaurant Recipes
This is my favorite dishe from Olive Garden and the one I have ordered most often.  When I made it, I was surprised by how similar it tasted to the real thing!
Ingredients:
(makes 5-6 servings)
White Sauce
  • 1 tablespoon butter 
  • 2 tablespoons flour 
  • milk
Scampi Sauce
  • 1 cup (2 sticks) butter
  • 2 tablespoons crushed garlic (real garlic; not salt or the dried stuff)
  • 2 tablespoons chicken stock
  • 3/4 cup Chablis or any white wine that's not too sweet
  • 3/4 cup water
  • 1/4 cup white sauce
  • 1 teaspoon crushed red pepper
  • 2 tablespoons Italian seasoning
  • Black pepper to taste
Other Ingredients
  • 1/2 package angel hair, cooked according to package directions
  • Thinly sliced bell peppers (red, green and yellow)
  • Thinly sliced red onions 
  • 10 whole garlic cloves
  • 2 chicken breasts
Directions:
  1. Start by making the white sauce:  
    1. Heat 1 tablespoon butter in nonstick skillet. 
    2. After it's melted, add 2 tablespoons flour and cook for 2 minutes on medium heat. 
    3. Slowly add milk and stir constantly to get rid of lumps. When you have added enough milk, you should have a white gravy consistency. Set this aside. 
  2.  Put the 10 garlic cloves in a small nonstick skillet with some oil and 
       braise them for about 20 minutes on low heat. Just put the lid on the 
       skillet and let them cook; they should be golden and really soft when 
       they are done. 
  3.  In a large nonstick skillet, sauté the peppers and onions for a few 
       minutes. 
  4.  Sauté chicken tenderloins (I sprinkled mine with salt and pepper and 
       dredged them in flour before cooking).
  5.  Cook the Angel Hair pasta according to the package directions.
  6.  Make the scampi sauce:
         1.  Heat butter over a slow heat. Add the garlic, Italian seasoning 
              and crushed red pepper. Cook for about 2 minutes on low heat. 
         2.  Add the wine, water, and chicken base. Stir until combined. 
         3.  Add the white sauce mix and stir until slightly thickened.
  7.  Add the braised garlic cloves to the sauce.  
  8.  Pour the sauce over the angel hair pasta and chicken.   

Dessert...
Olive Garden Black Tie Mousse Cake 
*recipe from Food.com 
This is an amazing cake!  I had it at Olive Garden and this recipe is a very good copycat.  It may not be the prettiest cake I ever made, but it sure is one of the tastiest!  It is time-consuming to make, but well worth it!
Ingredients:

BOTTOM LAYER

  • 1 (18 ounce) box of ordinary cake mix (devil's food)

SECOND LAYER

  • 1 teaspoon Knox unflavored gelatin
  • 1 tablespoon cold water
  • 2 tablespoons boiling water
  • 4 ounces semi-sweet chocolate chips
  • 4 ounces cream cheese, cubed
  • ¾ cup heavy cream
  • ½ teaspoon granulated sugar

THIRD LAYER

  • 3 egg yolks
  • ¼ cup granulated sugar
  • 3 tablespoons flour
  • 1 teaspoon Knox unflavored gelatin
  • 1 ¾ cups heavy cream
  • 1 teaspoon vanilla extract

FOURTH LAYER

  • 1 ½ cups heavy cream
  • 2 tablespoons butter
  • 18 ounces semi-sweet chocolate chips
  • ½ cup white chocolate chips (optional) 
  • Chocolate frosting to pipe as a border 
Directions: 
There are FOUR layers to make: 

BOTTOM LAYER (cake): 
  1. Bake according to directions on box in a 9" spring form cake pan.
  2. When the cake comes out of the oven use a paper towel to press it with your fingers and flatten the cake a little. This is the bottom layer out of four layers.
SECOND LAYER (the chocolate mousse):
  1. Melt chocolate and cream cheese together. Let cool. 
  2. Soften gelatin with cold water for 1 minute, then add boiling water, stir until dissolved and clear. Let this cool while you start whipping the heavy cream and sugar. 
  3. As cream starts to thicken, add gelatin. Continue to whip until stiff peaks form. 
  4.  Add 1/4 of the cream to the chocolate mixture and mix thoroughly. 
  5. Then fold this into the remaining cream. Once you have it completed, spread this chocolate mousse onto the cake and refrigerate.
THIRD LAYER (the custard):
The first 3 layers
  1. Beat egg yolks until pale. 
  2. Add sugar, flour, and gelatin, then beat until mixed. 
  3. Bring cream and vanilla extract to a boil. 
  4. Add a small amount of cream to egg mixture while stirring. 
  5. Gradually add until all of the cream has been added and then pour entire mixture through a strainer into the pan. 
  6. Continue to cook until custard begins to thicken. 
  7. Cool slightly, then pour on top of the chocolate mousse layer and freeze while getting the fourth layer ready.
FOURTH LAYER (the icing):
Please note: this makes a lot of icing so feel free to halve this part of the recipe (I halved it for mine and it was plenty). 
After the 4th layer is added and it's done
  1. Bring butter and cream to a boil, pour over chocolate and let sit for 5 minutes. 
  2. Stir until smooth. Let cool until it starts to thicken. 
  3. Remove cake from freezer, remove the cheesecake pan collar, then pour some of the icing and use a spatula to spread it evenly across the top and sides of the cake. 
  4. While this is still wet, put chocolate chips onto the side of the cake. (I did not do this because I thought the cake was rich enough)
  5. Optional: Melt half a cup of white chocolate chips (in the microwave) and swirl into the icing if you want yours to look like the picture.
  6. Refrigerate the cake. 
  7. Pipe chocolate frosting around the top as a border.
  8. Serve cold. Delicious!