Search this blog

Showing posts with label cake. Show all posts

Monday, February 4, 2013

Put the Lime in the Coconut (or in the Martini, Fish, and Cake)

I thought we deserved a little slice of summer in this dreary part of Winter.  All these dishes are light and limey.  Perfect for transporting you from cold, snowy weather to the warm sunshine of Key West!
Drink...
Key Lime Pie Martini
I recently discovered a new favorite drink - a lemon meringue pie martini.  This is basically the same drink, except instead of lemon, I used key lime juice.  It turned out delicious and tasting very close to a slice of pie.  Mine was a little sour for my taste, so you might want to add a little less lime juice.
Ingredients:
  • 2 oz cake flavored vodka (I think vanilla vodka would also be good if you don't have cake vodka)
  • 1 oz key lime juice
  • 1/2 oz simple syrup
  • splash of cream
  • lime for garnish
Directions:
  1. Pour all the ingredients except the lime into a shaker full of ice.
  2. Shake and strain.
  3. Pour into a chilled martini class and serve with a lime wedge, or a floating lime wheel.
Dinner...
Honey Lime Tilapia
*recipe from: One Lovely Life
I am gradually getting myself to enjoy eating fish and with a recipe like this, it makes it much easier.  This was delicious and easy.  Tilapia is such a non-fishy fish, which I love.  All you do it marinade it and saute it!
Ingredients:
(serves 4)
For the fish and marinade:
  • 4 (4-5oz) tilapia fillets (thawed if frozen)
  • Juice and zest of 1 lime
  • 1 Tbsp olive oil
  • 1½ Tbsp honey
  • ½ tsp salt
  • ½ tsp pepper
  • ¼ tsp garlic powder
For dredging and cooking:
  • ½c flour
  • ¼ tsp salt
  • ¼ tsp pepper
  • 1-2 Tbsp olive oil

Directions:
  1. Assemble marinade by combining lime zest, lime juice, olive oil, honey, salt, pepper, and garlic powder in a gallon-sized zip-top bag or shallow container with a lid. Add fish and marinate in the refrigerator anywhere from 1 hour up to 24 hours*.
  2. When ready to cook, combine flour with salt and pepper on a plate. Remove each fish fillet from the marinade and dredge lightly with the flour on both sides (just a light, light coating).
  3. Heat 1-2 Tbsp olive oil in a medium skillet over medium-high heat until shimmering. Cook fillets 2 at a time for 3-4 minutes per side or until opaque and browned (this works best if you don’t disturb the fish much while letting it cook).
  4. Serve with lime wedges.
Dessert...
Key Lime Pound Cake
*recipe from: MyRecipes.com
I've never made pound cake before, but it turns out it's pretty simple.  This makes a lot of cake!  I didn't have a tube pan like the recipe suggests using (I'm actually not even sure what a tube pan is), so I used a bundt cake pan.  In fact, this recipe made so much batter that I used two bundt cake pans...one cake for work, one cake for home :)  
Even though pound cake can be heavy, this cake tastes light and refreshing.  The glaze on mine was a bit sour, which I liked.  But, if you don't like things sour, I would add less lime juice or more sugar.
Ingredients:
For the cake:
  • 1 cup butter, softened 
  • 1/2 cup shortening
  • 3 cups sugar 
  • 6 large eggs 
  • 3 cups all-purpose flour 
  • 1/2 teaspoon baking powder
  • 1/8 teaspoon salt 
  • 1 cup milk 
  • 1 teaspoon vanilla extract
  • 1 teaspoon lime zest 
  • 1/4 cup fresh Key lime juice
For the glaze:
  • 1 cup powdered sugar
  • 2 tablespoons fresh Key lime juice
  • 1/2 teaspoon vanilla extract
Directions:
For the cake:
  1. Preheat oven to 325°. Beat butter and shortening at medium speed with a heavy-duty electric stand mixer until creamy. Gradually add sugar, beating at medium speed until light and fluffy. Add eggs, 1 at a time, beating just until blended after each addition.
  2. Stir together flour, baking powder, and salt. Add to butter mixture alternately with milk, beginning and ending with flour mixture. Beat at low speed just until blended after each addition. Stir in vanilla, lime zest, and lime juice. Pour batter into a greased and floured 10-inch (12-cup) tube pan.
  3. Bake at 325° for 1 hour and 15 minutes to 1 hour and 20 minutes or until a long wooden pick inserted in center comes out clean. Cool in pan on a wire rack 10 to 15 minutes; remove from pan to wire rack.
  4. Prepare Key Lime Glaze, and immediately brush over top and sides of cake. Cool completely (about 1 hour).
For the glaze:
  1. Whisk together powdered sugar, fresh Key lime juice, and vanilla until smooth. Use immediately.

Wednesday, September 26, 2012

O 'Zapft Is!

At exactly 12:00 noon on the first day of the Oktoberfest, the Mayor of Munich taps the first keg of beer and yells "O‘zapft is!" ("the keg is tapped"). This officially declares the festival open.  I have found that many people in the U.S don't realize that Oktoberfest is actually celebrated in September.  Traditionally, it begins the first Saturday after September 15th and ends the first Sunday in October.  So, lucky you...this post is just in time for you to whip up a delicious Oktoberfest dinner! :)
Drink...
Samuel Adams Octoberfest
Usually I try not to just feature a beer or a glass of wine as the drink for my blog.  However, beer is the key ingredient to Oktoberfest, so I had to do it this time.  This beer was good and I believe it is best served in a stein like one pictured above.  
Ingredients:
  • a cold Octoberfest beer
  • a beer stein 
Directions:
  1. Pour the beer into the stein (steins are big - you may need a couple beers to fill it up).
  2. Drink and yell "Prost! (cheers!)"
Dinner...
Apple Oktoberfest Cheese Soup
*recipe from Evil Shenanigans
Do you like cheese?  How about bacon? Oh, and then a little beer to make everything yummy, and Oktoberfesty.  When I saw the recipe for this soup I figured it would be good, but I had no idea how good.  It is like a spoonful of  German autumn in every bite (ok, I have never been there...but I could imagine this soup would be perfect on a crisp fall day during Oktoberfest in Germany).  
I have to give credit to my husband, Doug...he actually made this one!
Ingredients:
(serves 4)
  • 2 strips bacon, chopped
  • 3 tablespoons butter
  • 1 medium onion, chopped
  • 1 Granny Smith apple, peeled, cored and diced
  • 1 medium carrot, peeled and chopped
  • 1 rib celery, chopped (We omitted this)
  • 1/2 teaspoon kosher salt
  • 1/2 teaspoon pepper
  • 1/4 teaspoon dry mustard powder
  • 1/4 teaspoon smoked paprika
  • 1/4 teaspoon cayenne pepper
  • 1 clove garlic, sliced
  • 1/4 cup all-purpose flour
  • 1 cup chicken stock
  • 1 cup Oktoberfest style beer (I used Sam Adams)
  • 2 cups milk
  • 5 ounces sharp cheddar cheese
  • 3 ounces smoked Gouda
Directions:
  1. In a medium pot over medium heat add the chopped bacon.  Cook until the bacon is very crisp, about 3 minutes.  Remove the bacon from the pot reserving the fa
  2. Add the butter to the pot and once it foams add the onion, apple, carrot, celery, salt, and pepper.  Cook until the mixture is starting to become tender, about 5 minutes, then add the dry mustard, paprika, and cayenne pepper.   Stir to combine and cook for another 5 minutes, or until the vegetables are very tender.  Add in the sliced garlic and cook until fragrant, about 1 minute.
  3. Add in the flour and cool for 3 minutes, stirring constantly, to cook out the raw taste of the flour.  Reduce the heat to medium-low and slowly add in the chicken stock, beer, and milk, stirring constantly to remove any lumps of flour.  You may need to whisk it during this process.  Once combined increase the heat to medium-high and cook until the soup comes to a boil and thickens, about 5 minutes.  Remove the pot from the heat and allow to cool for 3 minutes. 
  4. Working in batches, blend the soup in a blender until very smooth, about 3 minutes on the highest speed (or use an immersion blender like we did).  Add the cheese, in batches, to the soup and blend until the cheese is melted.  Once all the soup is blended return it to the pot.
  5. Heat the soup over medium heat to re-warm.  Season with hot sauce, and additional salt and pepper as desired.  Serve the soup with the crumbled bacon as a garnish.
Dessert...
Butterkuchen (Butter Cake)
*recipe from German Food Guide and Directory
Butterkuchen is a type of Blechkuchen.  The word Blech means "sheet" so a Blechkuchen is a German cake that is baked on a large baking sheet. These cakes are usually rectangular in form and they are cut into squares for serving. There is no one "typical" Blechkuchen because it is how the cake is baked (on a large baking sheet) that makes it a Blechkuchen, not its ingredients. In fact, there are so many different varieties of Blechkuchen because many kinds of doughs and toppings can be used.  Tradionally, Blechkuchen are made with a yeast dough or a dough that can be easily rolled out.  
Butterkuchen is a butter cake, the most basic Blechkuchen. It is made from a yeast dough, which is baked with a topping of butter pieces and sugar. Some regions also add almond slices as a topping.  
This is definitely a different interpretation of a cake.  It reminded me of a  dessert pizza since the dough is thin and rolled out onto a baking sheet.  When I was making it, I thought, "oh, this is too much sugar."  Then, I thought, "oh, this is too much butter."  But, I stuck with the recipe and it turned out delicious.  The amount of butter and sugar may seem like a lot, but they sure do make it taste good.  I am officially a Butterkuchen girl now!
Ingredients:
(serves 12)
For the Dough:
  • 4 cups All Purpose Flour
  • 1/2 cup Unsalted Butter (1 stick)
  • 1 Egg
  • 1/4 cup + 1 tablespoon Sugar
  • 1 package Active Dry yeast
  • 1/2 teaspoon Salt
  • 1 cup Milk, lukewarm
  • Zest from half of a Lemon
For the Topping:
  • 1 cup (2 sticks) Unsalted Butter, cut into tiny cubes
  • 1 cup Sugar
  • 1 1/2 cups Sliced Almonds
  • 1 teaspoon Cinnamon
Directions:
  1. In a small bowl, combine the yeast and half of the milk. Mix in 2 tablespoons of the flour and 1 teaspoon of the sugar. Allow this mixture to sit in a warm place for 1 hour.
  2. Combine remaining dough ingredients then add in the yeast mixture. Mix until a smooth dough forms, then knead by hand. Allow dough to sit in a warm place until double in volume.
  3. Preheat oven to 400°F (200°C).
  4. Grease a baking sheet. Roll out dough to fit the size of the baking sheet. Transfer dough to baking sheet.
  5. Sprinkle the sliced almonds, sugar, cinnamon, and butter cubes over the dough.
  6. Allow cake to sit and rise for another 30 minutes.
  7. Bake cake for around 30 minutes or until a golden crust develops.
  8. Remove cake from oven and allow to cool. Before serving, cut into squares.

Monday, July 9, 2012

Happy (belated) 4th of July!

I meant to get this post out a little earlier, but i have been slightly busy with wedding planning (since the big day is this weekend).  Since the 4th is already over, I'd say use these recipes for any barbeque, or save them for next year! :)

Drink...
Patriotic Sangria
I don't really know how to make proper sangria.  When I looked up recipes online, I found quite a few variations.  So, I just used bits and pieces of everything I found and made up my own recipe.  It was pretty good!  The part that makes it patriotic are the red strawberries, blue blueberries, and pinapple cut into star shapes (sorry, you can't really see my stars in the picture).  You could easily make this a non-alcoholic, kid-friendly drink by just using a white grape juice or a sparkling grape juice with the fruit (my mom had it with sparking grape juice).
Ingredients:
     
  • White Wine (or juice for non-alcoholic)
  • Apple Jucie
  • Club Soda
  • Sugar
  • Strawberries, sliced
  • Blueberries
  • Pinapple, cut with a cookie cutter into a star shape
Directions:
  1. Place strawberries, bluberries, and star shaped pineapple in the bottom of a glass.
  2. Fill glass 3/4 of the way with white wine.
  3. Add a couple splashes of apple juice.
  4. Add a splash of club soda.
  5. Add a couple tablespoons of sugar.
  6. Stir to dissolve the sugar and enjoy cold.
Dinner...
Best Barbeque Burgers & Maureen's Foil Pack Potatoes
Can you tell I am taking advantage of being home with my parents and using the grill?  I will definitely miss grilling when I go back to NYC!  Plus, what's a Fourth of July meal without grilling?
P.S - sorry about that picture above.  The food doesn't look so great, but I was in a hurry to eat that burger, so there was no time to make it look pretty! :) And, with my wedding coming up, I decided not to have a bun, so the burger looks a bit strange and naked.
Best Barbeque Burgers
*recipe from Six Sisters Stuff
I found this recipe on Pintrest and the writer claimed they were the best burgers she's made.  Well, I don't make many burgers, but they are one of my favorite foods, and I eat a lot of them :)  I can't say these were the best I've ever had, but they were very good.  The barbeque sauce in the meat adds a different flavor and the sauce on top of them is a great finishing touch.  I would make them again!
Ingredients:
(makes 5 big burgers)
Burger:
  • 1 lb ground beef (I used 85/15- you want a fattier meat to make a juicier burger!)
  • sesame seed buns (I used regular buns)
  • 1/2 cup Monterrey jack cheese, grated
  • 1/4 cup BBQ sauce
  • seasoned salt to taste
  • cracked black pepper
  • onion powder
Secret Sauce:
  • 3/4 cup of mayo
  • 1/4 cup ketchup
  • 1/4 cup relish
  • 2 tablespoons Worcestershire sauce
  • seasoned salt
Directions:
  1. Combine the ground beef, grated cheese, bbq sauce, and seasonings. Shape patties that are about 1 inch thick. With the 1 pound of ground beef I made 5 large patties.
  2. Turn grill up to high and let it get hot.
  3. Reduce heat to medium-high and place the burgers on the grill. Allow this side of the patty to cook for about 4-6 minutes, but make sure it doesn’t burn. Then flip the burger over and cook until done.
  4. For the sauce: Combine all ingredients and whisk until well mixed. Taste and adjust ingredients to your liking.
  5. Assemble the burgers and serve with the special sauce, avocado, lettuce, tomato, cheese, pickles and your other favorite hamburger toppings!
Maureen's Foil Pack Potatoes
*recipe from Maureen K.
We used to eat these potatoes a lot when I was a kid.  I remembered loving them and decided to make them again.  They were just as great as I remembered.  Also, they are really easy because once they are in the foil, you don't have to do anything but leave them on the grill.  That leaves you plenty of time to enjoy your 4th of July instead of fussing over the food!
Ingredients:
(serves 6)
  • 
    my potatoes ready to be wrapped up!
    5-6 baking potatoes,peeled and cubed
  • 1 lg. (or 2 med.) onion, sliced
  • 1 lb. carrots, peeled and cut into chunks
  • 1 stick margarine, sliced
  • garlic powder
  • salt
  • pepper
  • parmesan cheese
  • oil
Directions:
    
    Potatoes and burgers gilling away!
    
  1. Make 1 large, or 2 medium, double strength aluminium packets for potatoes. Thinly coat the inside of packet with oil to prevent vegetables from sticking and burning.
  2. Add 1/2 of potatoes, 1/2 of onions, 1/2 of carrots to packet. Sprinkle top with garlic powder, salt, pepper and parmesian cheese. Top with 1/2 of the margarine slices.
  3. Add remaining potatoes, onions and carrots. Sprinkle  with  garlic powder, salt, pepper and parmesian cheese. Top with remaining margarine. (I sometimes sprinkle thyme or rosemary in with the potatoes - depending on the type of meat I am serving with them).
  4. Seal aluminium tightly. Wrap packet in another layer of aluminium foil to prevent the juices from leaking out into the barbecue.
  5. Cook on side of barbecue, along with main course, approx. 1-1/2 hours. Turn packets over occasionally.
  6. Remove from grill, carefully open packages (steam and inside juices are very hot), place in bowl and serve.
Dessert...
4th of July Surprise Cake
*recipe from Glorious Treats
I first saw this cake a couple years ago when my cousin Erin made it for the 4th of July.  I love it because on the outside it looks like a plain, boring cake.  But, when you cut into it, everyone is surprised by what's inside!  The blog linked to above has great step-by-step instructions with pictures.
Ingredients:
  • 2 boxes of vanilla cake mix
  • ingedients listed on the box to make the cake
  • 2 tubs of store bought vanilla icing
  • strawberries
  • blueberries
Directions:
  1. Prepare a total of two Vanilla cake mixes (from a box- but feel free to use any Vanilla cake recipe you love).  Prepare two 8″ cake pans by coating with a small amount of butter and flour, and placing parchment paper in the bottom.
  2. Prepare one batch of batter and color it red (I used Americolor super red gel).  Divide the batter equally and pour into the two prepared pans.  Bake as instucted by your recipe.
  3. While the red cakes are baking, prepare another batch of batter.  Divide the batter into two bowls and color one of the bowls of batter blue.  Leave the remaining bowl of batter uncolored.
  4. 
    When your red cakes have baked and cooled, remove from pans.  Wash and then prepare pans for the white and blue batter.  Bake.
  5. However you get there, what you want to end up with is..
    1. 1- 8″ round blue cake
    2. 1- 8″ round white cake
    3. 2- 8″ round red cakes
  6. Slice the two red cake in half (horizontally), so you’ll have a total of 4 red layers.  Set aside one layer, this will not be used for the cake.  Cut a 4″ circle out of one of the layers.  So you want to have two 8″ round layers and one 4″ round layer. 
  7. Cut the white cake in half as well.  Then use a 4″ cookie cutter to cut a circle out of one of the halves.
  8. Use a 4″ cookie cutter again (or make cut out a 4″ circle of cardboard and use that as your template) to cut out the center of your blue cake.
  9. You’re ready to assemble your cake when you have…
    1. 1 thick layer of blue, with the center cut out
    2. 2- 8″ layers of red
    3. 1- 4″ layer of red
    4. 1- 8″ layer of white
    5. 1- 4″ layer of white
  10. Prepare a batch of Vanilla frosting. I was being lazy and used store bought frosting.
  11. Assemble cake with a thin layer of frosting between each layer of cake, starting on the bottom with red cake, then white, then red, then blue.  Add some frosting along the inside “ring” of the blue cake to hold in the next two layer which will fit inside the opening.  Fill the hole in the blue cake with a 4″ round layer of with cake, some frosting, then the 4″ round of red.
    My un-iced, assembled cake
    

  12. Once assembled, frost the cake as desired.  Chill the frosted cake in the refrigerator until you’re ready to serve it.  Then cut it open and smile at the pretty surprise inside. 
  13. SURPRISE!

Thursday, May 3, 2012

Birthday Dinner

This is my big birthday—not only is it my 30th, but it was also my Golden Birthday!  I had a great day and to celebrate, I made myself a special birthday dinner.  Hmmm . . . I'll have to remember next year to have a guest blogger and have Doug make my birthday dinner :)
Drinks...
Birthday Drink
*recipe adapted from Sweetapolita
The original recipe was for birthday shots, but I decided that I would prefer a whole drink.  Also, I did not buy all of the ingredients, so I left a few things out.  Despite all the changes, it was still a great drink.  It kind of reminded me of a chocolate martini.  It also had quite a kick since it was made of almost all alcohol.  We even had a candle in it at one point for an extra special birthday treat!
Ingredients:
  • 3 ounces cake flavored vodka (e.g. Pinnacle or Three Olives)
  • 1 1/2 ounces whipped cream flavored vodka (e.g. Pinnacle) or chocolate liqueur (I used chocolate liqueur)
  • 1 ounce half & half
  • whipped cream (for topping)
  • sprinkles (for topping)
Directions:
  1. Pour all the ingredients in a shaker with ice.
  2. Shake, strain, pour.
  3. Sing "Happy Birthday"
  4. Enjoy!
Dinner...
Scallops with Linguine
*recipe from Maureen K.
When I was a kid, my mom always let us choose what we wanted her to make for our birthday dinners.  I had a few recipes of hers that were my favorite, but I frequently chose Shrimp and Linguine.  So, for this dinner, I thought I would make an old classic birthday dinner (that I still love).  I did change one thing . . . Doug doesn't like shrimp and I wanted us to both be able to eat it, so I made is with Bay Scallops (or Small Scallops as they call them here in NYC).  It was just as good as the old days!
Ingredients:
  • 1/2 cup margarine or butter (I went with butter . . . it is my birthday after all!)
  • 1/4 cup olive oil
  • 6 cloves of garlic (this is a lot, but I love garlic)
  • 1/2 lb – 1 lb of Bay Scallops or Shrimp
  • 1/4 cup parsley
  • 1/4 tsp dried basil
  • 1/4 tsp dried oregano
  • 1/4 tsp salt
  • dash black pepper
  • 1 lb linguine (Trader Joe's only has whole wheat spaghetti, so I used that.  But, I missed the linguine)
  • grated Parmesan cheese

Directions:

Scallops cooking in a yummy bath
  1. Melt butter in a saucepan, add oil and heat.
  2. Saute garlic and scallops/shrimp in the oil mixture over medium heat 2-3 minutes.

  3. Stir in parsley, basil, oregano, salt, and pepper.  Simmer 5-10 minutes.
  4. Cook spaghetti per package directions and drain well.
  5. In a large bowl toss linguine, sauce, and Parmesan cheese to taste. 
Dessert...
Devil's Food Cake with Chocolate Mousse Buttercream 
*recipe from Sticky, Chewy, Messy, Gooey by: Jill O'Connor
This is my new favorite cake.  I have made it a couple times before and it is always a hit!  Beware though, because it tastes good for a reason.  It is probably the worst thing for you I have ever made!  It makes a huge cake and is so good I couldn't resist.  I think I shed a tear when I ended up having to throw a lot of it away because I was just enjoying too much of it!  From now on, I am only making it for a large group so I am only able to have 1 slice!  The recipe is a little involved, but it is well worth it!
Ingredients:
For the cake-
  • 1/3 cup cocoa powder
  • 1 tsp instant espresso
  • 4 oz semisweet or bittersweet chocolate, finely chopped
  • 1 cup boiling water
  • 2 tsp vanilla extract
  • 1 cup buttermilk
  • 1/2 cup unsalted butter, at room temperature
  • 1/2 cup vegetable oil
  • 1 cup firmly packed brown sugar
  • 1 cup granulated sugar
  • 3 large eggs
  • 2 1/4 cups flour
  • 1 tsp baking soda
  • 1/2 tsp salt
  • chocolate mousse buttercream
For the chocolate mousse buttercream-
  • 6 large eggs
  • 1 1/2 cups sugar
  • 2 tbs cocoa powder
  • 1 tsp vanilla
  • pinch of salt
  • 1 1/2 lbs cold unsalted butter
  • 12 oz semisweet chocolate, melted

Directions:

For the Devil's Food Cake-
  1.  Preheat oven to 350 degrees.
  2. Spray two 9 inch pans with non-stick cooking spray.
  3. In a large bowl, combine the cocoa powder, espresso powder, and chocolate.  Pour in the boiling water and stir until the chocolate is melted and the mixture is smooth.  Stir in the vanilla.  Let the mixture cool, then stir in the buttermilk.
  4. In another bowl, using an electric mixer at medium speed, beat the butter and oil together until light and fluffy.  Add the sugars and beat until creamy.  Beat in the eggs, one at a time, beating well after each addition.
  5. Sift together the flour, baking soda, and salt.  Add one-third of the flour mixture to the batter and beat at low speed for a few seconds, just until combined.  Beat in half of the chocolate-buttermilk mixture, again beating just a few seconds until combined.  Scrape the sides of the bowl with a rubber spatula.  Beat in another one-third of the remaining flour mixture for no more than a few seconds, just until combined.  Add the remaining chocolate-buttermilk mixture, beating for just a few seconds.  Scrape down the bowl.  Fold in the remaining one-third of the flour mixture by hand, using a spatula, just until no streaks of flour remain.
  6. Divide the batter into the two cake pans.  Bake until a toothpick comes out clean, 25-30 minutes.  Transfer onto wire racks to cool.  Let cool completely before frosting.
  7. Half each layer horizontally using a long serrated knife for a total of 4 layers.  Top each layer with mousse buttercream and then use the remaining buttercream to frost the top and sides of the cake.  
To make the Chocolate Mousse Buttercream-
  1. Whisk together the eggs, sugar, and cocoa powder in a metal bowl.
  2. Fill a large saute pan or skillet with water and bring to a simmer.  Place the bottom of the metal bowl in the simmering water and whisk the egg mixture constantly until the sugar is completely dissolved and the mixture is thick and fluffy and very hot, 3–4 minutes.  Use an instant read thermometer to check the temperature of the mixture.  It should be between 120 and 140 degrees.
  3. Remove the bowl from the simmering water and using the whisk attachment, beat the eggs until they are tripled in volume and form soft peaks and the bottom of the bowl is completely cool to the touch, about 10 minutes.  Beat in the vanilla and salt.
  4. While the eggs are mixing, unwrap the individual sticks of butter and re-wrap them loosely in plastic wrap.  Pound the butter 5–6 times with a rolling pin, or until the butter is soft and malleable but still cool.
  5. While the mixer is still on medium high, add the butter approximately 2 tbs at a time, to the egg mixture, beating each addition until it is incorporated.  Don't start to panic if the buttercream seems too liquidy or looks curdled as you beat in the butter.  It will magically emulsify into a smooth, creamy frosting by the time the last bit of butter is mixed in.
  6. When the buttercream is smooth and glossy with a subtly brown tint from the cocoa powder, turn off the mixer and using a rubber spatula, carefully fold in the melted chocolate.


Monday, February 27, 2012

My Big Secret

Alright, I have a secret to confess . . .
In most places, this secret would not be a big deal at all, but here in Manhattan, I risk becoming an outcast in all my social circles.
For the sake of this blog, I will let my secret out.  Here it is:
I like Olive Garden.
There, it's out.  That wasn't so bad.  I know there are others out there like me, so maybe this will make it easier for them to come clean.  Then, once more people admit it, maybe we could all go out to dinner at Olive Garden to celebrate!
No one in NYC eats at a chain restaurant unless it is a small, NYC only chain, or they are tourists.  So, if you are still too scared to admit your love for chain restaurant food, now you can make it home and eat it secretly in your apartment.
Drink...
Raspberry Lemonade
*recipe from My Baking Addiction
When I go to Olive Garden, I don't typically drink alcoholic beverages (maybe since I haven't been there much since I was old enough to drink).  Usually I order raspberry lemonade.  Their raspberry lemonade is nothing spectacular, and in fact, after doing a little web research, I think theirs is really just Minute Maid raspberry lemonade.  So, I made my own and I think it's even better than Olive Garden's. 
Ingredients:
(makes a pitcher of lemonade)
  • 1 cup sugar
  • 1 cup of water
  • ¾ cup raspberries; pureed and pushed through a fine mesh sieve; plus more whole berries for garnish if desired
  • 1 cup fresh lemon juice (this equaled close to 8 of my lemons)
  • 4-6 cups cold water (this will vary depending on your taste)
Directions:
  1. Make a simple syrup by combining the sugar with 1 cup of water in a saucepan. Place over medium heat and heat until the sugar in completely dissolved; swirl the pan occasionally. Let cool.
  2. Measure 3/4 of fresh raspberries and puree them in your blender or food processor. (I don't have a blender or a food processor, so I just mashed them up with a fork and it worked surprisingly well)
  3. Push the raspberry puree through a fine mesh sieve to separate the seeds from the pulp.
  4. Once the simple syrup has cooled, combine the raspberry puree, simple syrup and lemon juice in a large pitcher.
  5. Add 4-6 cups of cold water. The amount of water you use will depend on your taste, so add as little or as much as you want to achieve your perfect sweet/tart balance. 
Dinner...
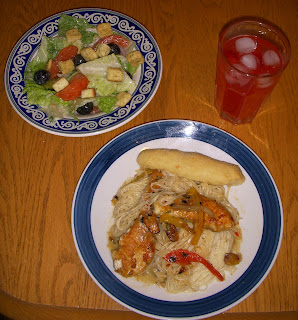
Chicken Scampi with Salad and Breadsticks
This meal was really good.  However, I will say, it was one of the more difficult meals I have made on my blog so far.  The chicken dish is a little involved, but more than anything, it was hard to make all aspects of the meal and have everything ready at the same time.  Those Olive Garden cooks must be good :)

Olive Garden Salad
*recipe from Heritage School House
There is something irresistible about Olive Garden's salad.  I have even made their salad the main part of my meal before by only ordering soup, salad, and breadsticks.  This recipe is not exactly the same, but it's close enough.  I'm pretty excited to be able to make it at home and it's easy!
Ingredients:
(serves 6)
for dressing
  • 1/2 cup mayonnaise
  • 1/3 cup white vinegar
  • 1 teaspoon vegetable oil
  • 2 tablespoons corn syrup
  • 2 tablespoons parmesan cheese
  • 2 tablespoons romano cheese
  • 1/4 teaspoon garlic salt
  • 1/2 teaspoon italian seasoning
  • 1/2 teaspoon parsley flakes
  • 1 tablespoon lemon juice
for salad
  • American blend bagged salad mix
  • red onion slices
  • black olives
  • pepperoncini peppers
  • croutons
  • roma tomatoes, sliced
  • parmesan cheese, freshly grated
Directions:
  1. Mix all dressing ingredients in a blender or processor until well blended. 
  2. Toss salad ingredients and top with dressing.
Olive Garden Breadsticks
 *recipe from Full Bellies, Happy Kids
Even people who say they don't like Olive Garden often will admit, "Well, they do have really good breadsticks."  I know, you're thinking, but Megan . . . you said you would never make bread again!  Well, it seems like that's one of those things that I will keep saying, but not actually do.  There are just so many good bread recipes out there, I can't pass them up!  This was one of my more successful bread attempts.  Doug enjoyed the breadsticks much more than I did, but they were pretty good.  The flavor was consistent with Olive Garden, but the texture was off (mine were a little too dense - not light and fluffy).  
Ingredients:
(makes 10-12 breadsticks)
  • 1 1/2 cups warm water (between 110 - 120 degrees F)
  • 1 package active dry yeast
  • 4 1/4 cups all-purpose flour
  • 2 tablespoons unsalted butter, melted
  • 2 tablespoons sugar
  • 1 tablespoon salt 
For basting:
  • 1 stick unsalted butter (or 1/2 cup margarine)
  • 2 teaspoons garlic powder
  • 2 teaspoons salt
Directions:
  1. In a large bowl, dissolve sugar and yeast in warm water and allow to sit for 10 minutes, covered. Mixture should be frothy.
  2. In separate bowl, combine flour and salt.  
  3. Add flour and salt to yeast mixture. Add melted butter. Mix with paddle attachment of stand mixer or wooden spoon until fully combined. 
  4. Knead dough for a few minutes just until dough is smooth. Do not over-knead!
  5.  Grease a cookie sheet. Pull off pieces of dough and roll out into strips. 
  6. Cover the dough and let sit in a warm place for 45 minutes to an hour.
  7. Preheat your oven to 400 degrees F and once heated, pop in the bread sticks. In microwave, combine the basting ingredients.
  8. After 6 or 7 minutes in the oven, brush the bread sticks with half the butter mixture. 
  9. Then continue to bake. Honestly, I almost never leave them in there for an entire 15 minutes—normally it's closer to 12 because I like them softer and less crisp on the outside, but to each their own. Either way, immediately upon removal from the oven brush the other half of the butter on the breadsticks.
  10. Allow them to cool for a minute or two, and enjoy!    
Chicken Scampi
*recipe from Easy Restaurant Recipes
This is my favorite dishe from Olive Garden and the one I have ordered most often.  When I made it, I was surprised by how similar it tasted to the real thing!
Ingredients:
(makes 5-6 servings)
White Sauce
  • 1 tablespoon butter 
  • 2 tablespoons flour 
  • milk
Scampi Sauce
  • 1 cup (2 sticks) butter
  • 2 tablespoons crushed garlic (real garlic; not salt or the dried stuff)
  • 2 tablespoons chicken stock
  • 3/4 cup Chablis or any white wine that's not too sweet
  • 3/4 cup water
  • 1/4 cup white sauce
  • 1 teaspoon crushed red pepper
  • 2 tablespoons Italian seasoning
  • Black pepper to taste
Other Ingredients
  • 1/2 package angel hair, cooked according to package directions
  • Thinly sliced bell peppers (red, green and yellow)
  • Thinly sliced red onions 
  • 10 whole garlic cloves
  • 2 chicken breasts
Directions:
  1. Start by making the white sauce:  
    1. Heat 1 tablespoon butter in nonstick skillet. 
    2. After it's melted, add 2 tablespoons flour and cook for 2 minutes on medium heat. 
    3. Slowly add milk and stir constantly to get rid of lumps. When you have added enough milk, you should have a white gravy consistency. Set this aside. 
  2.  Put the 10 garlic cloves in a small nonstick skillet with some oil and 
       braise them for about 20 minutes on low heat. Just put the lid on the 
       skillet and let them cook; they should be golden and really soft when 
       they are done. 
  3.  In a large nonstick skillet, sauté the peppers and onions for a few 
       minutes. 
  4.  Sauté chicken tenderloins (I sprinkled mine with salt and pepper and 
       dredged them in flour before cooking).
  5.  Cook the Angel Hair pasta according to the package directions.
  6.  Make the scampi sauce:
         1.  Heat butter over a slow heat. Add the garlic, Italian seasoning 
              and crushed red pepper. Cook for about 2 minutes on low heat. 
         2.  Add the wine, water, and chicken base. Stir until combined. 
         3.  Add the white sauce mix and stir until slightly thickened.
  7.  Add the braised garlic cloves to the sauce.  
  8.  Pour the sauce over the angel hair pasta and chicken.   

Dessert...
Olive Garden Black Tie Mousse Cake 
*recipe from Food.com 
This is an amazing cake!  I had it at Olive Garden and this recipe is a very good copycat.  It may not be the prettiest cake I ever made, but it sure is one of the tastiest!  It is time-consuming to make, but well worth it!
Ingredients:

BOTTOM LAYER

  • 1 (18 ounce) box of ordinary cake mix (devil's food)

SECOND LAYER

  • 1 teaspoon Knox unflavored gelatin
  • 1 tablespoon cold water
  • 2 tablespoons boiling water
  • 4 ounces semi-sweet chocolate chips
  • 4 ounces cream cheese, cubed
  • ¾ cup heavy cream
  • ½ teaspoon granulated sugar

THIRD LAYER

  • 3 egg yolks
  • ¼ cup granulated sugar
  • 3 tablespoons flour
  • 1 teaspoon Knox unflavored gelatin
  • 1 ¾ cups heavy cream
  • 1 teaspoon vanilla extract

FOURTH LAYER

  • 1 ½ cups heavy cream
  • 2 tablespoons butter
  • 18 ounces semi-sweet chocolate chips
  • ½ cup white chocolate chips (optional) 
  • Chocolate frosting to pipe as a border 
Directions: 
There are FOUR layers to make: 

BOTTOM LAYER (cake): 
  1. Bake according to directions on box in a 9" spring form cake pan.
  2. When the cake comes out of the oven use a paper towel to press it with your fingers and flatten the cake a little. This is the bottom layer out of four layers.
SECOND LAYER (the chocolate mousse):
  1. Melt chocolate and cream cheese together. Let cool. 
  2. Soften gelatin with cold water for 1 minute, then add boiling water, stir until dissolved and clear. Let this cool while you start whipping the heavy cream and sugar. 
  3. As cream starts to thicken, add gelatin. Continue to whip until stiff peaks form. 
  4.  Add 1/4 of the cream to the chocolate mixture and mix thoroughly. 
  5. Then fold this into the remaining cream. Once you have it completed, spread this chocolate mousse onto the cake and refrigerate.
THIRD LAYER (the custard):
The first 3 layers
  1. Beat egg yolks until pale. 
  2. Add sugar, flour, and gelatin, then beat until mixed. 
  3. Bring cream and vanilla extract to a boil. 
  4. Add a small amount of cream to egg mixture while stirring. 
  5. Gradually add until all of the cream has been added and then pour entire mixture through a strainer into the pan. 
  6. Continue to cook until custard begins to thicken. 
  7. Cool slightly, then pour on top of the chocolate mousse layer and freeze while getting the fourth layer ready.
FOURTH LAYER (the icing):
Please note: this makes a lot of icing so feel free to halve this part of the recipe (I halved it for mine and it was plenty). 
After the 4th layer is added and it's done
  1. Bring butter and cream to a boil, pour over chocolate and let sit for 5 minutes. 
  2. Stir until smooth. Let cool until it starts to thicken. 
  3. Remove cake from freezer, remove the cheesecake pan collar, then pour some of the icing and use a spatula to spread it evenly across the top and sides of the cake. 
  4. While this is still wet, put chocolate chips onto the side of the cake. (I did not do this because I thought the cake was rich enough)
  5. Optional: Melt half a cup of white chocolate chips (in the microwave) and swirl into the icing if you want yours to look like the picture.
  6. Refrigerate the cake. 
  7. Pipe chocolate frosting around the top as a border.
  8. Serve cold. Delicious!