Search this blog

Wednesday, October 31, 2012

Boo! Happy Halloween!

I feel like Halloween got a little lost in the shuffle among all the hurricane devastation, but I still made some delicious treats that will hopefully cheer up your holiday!  These foods are all pretty kid-oriented and would be perfect for a Halloween party (although grown-ups will enjoy them just as much).  To top it off, they are all super-simple to make!
Drink...
Boo Cups
*recipe from Meet the Dubians
So....I thought these were going to be a drink when I made them, but they definitely were not a liquid.  I would call them a dessert, but I already had another dessert I made.  So, into the drink section they go!  They were quite tasty, but basically just tasted like creamy orange Jello (not surprisingly based on the ingredients).
Ingredients:
  • 3/4 cup boiling water 
  • 1 pkg.(3 oz.) Jello Orange Flavor Gelatin
  • 2 cups ice cubes 
  • 2/3 cup thawed Cool Whip, divided 
  • 8 miniature semi-sweet chocolate chips
Directions:
  1. Add boiling water to gelatin mix in large bowl; stir 2 min. until completely dissolved. 
  2. Add ice; stir 3 to 5 min. or until gelatin is thickened. Remove any un-melted ice. 
  3. Whisk in 1/3 cup Cool Whip until well blended. 
  4. Pour into 4 dessert dishes. It will be pretty liquidy at this point but will firm up nicely in the fridge.  Refrigerate 30 min. or until firm. 
  5. Drop remaining Cool Whip by spoonfuls onto desserts to resemble ghosts. Add chocolate chips for the eyes.
Dinner...
Mummy Dogs
*recipe from: Our Best Bites
Hot dogs are delicious.  Crescent rolls are delicious.  Combine the two and you get a super-yummy treat!  It doesn't get much easier than this!
Ingredients:
  • hot dogs or Lil smokies mini hot dogs 
  • crescent roll dough
  • mustard
Directions:
  1. Wrap the crescent dough around the hot dogs to mummify them.  Be sure to leave a spot open for their eyes.
  2. Place them on a baking sheet and bake according to the crescent roll package directions (I believe it was 11-13 minutes).
  3. After removing them from the oven, put two drops of mustard on them for eyes.
Dessert...
Brownie and Pretzel Skeletons
*recipe from: Wants and Wishes
I saw these on Pintrest and couldn't resist making them.  They are so cute and easy to make.  I think they would look great on a dessert table at a Halloween party, or would make great party gifts if you wrap them up and make a Halloween tag!  
Ingredients:
  • 1 box of brownie mix and the ingredients listed on the box to make the brownies.
  • pretzels
  • white chocolate
  • jumbo marshmallows
  • edible ink marker
  • lollipop or cake pop sticks
Directions:
  1. Bake the brownies according to the package directions.  Allow them to cool and cut them into small squares.
  2. Melt the white chocolate and dip the pretzels in it so they are coated.
  3. Use the marker to draw a skeleton face on the marshmallows.
  4. Assemble the skeletons:
    1. Put a brownie piece on the bottom.  
    2. Stand a lollipop stick up in the brownie.  
    3. Stack the chocolate covered pretzels on top of the brownie by placing the stick through the holes of the pretzels.  
    4. Add a marshmallow to the top of the stick.

Tuesday, October 30, 2012

Hurricane Sandy Supper

Since the hurricane has been all everyone is talking about lately, and we have been stuck inside our apartment for the last couple days, I decided to do a hurricane blog post.  We couldn't go out to the grocery store for ingredients, so we created a drink, dinner, and dessert using only the random ingredients we had in our apartment.  For a last minute, "Chopped"-style dinner, it turned our quite nicely!
Drink...

Lemon Meringue Pie Martini
*recipe from Pinnacle Vodka
I think Hurricane Sandy may have introduced me to a new favorite drink! We still have cake vodka from my birthday in April (vodka doesn't expire, right?) and I never quite know what to do with it.  I found a bunch of recipes on the Pinnacle website for and happened to have all the ingredients for this one.  It is delicious - it's like drinking dessert!
Ingredients:
  • 2 oz of cake flavored vodka
  • 1 oz lemon juice
  • 1/2 oz simple syrup
  • splash of cream
Directions:
  1. Pour all the ingredients into a shaker with ice.  
  2. Shake and strain into a martini glass.

Dinner...
Sausagey Storm Supper
Doug created this dinner out of random things we had leftover in our fridge and it was excellent.  I would definitely have it again.  He used Trader Joe's sweet apple chicken sausage (left over from my stuffed squash blog post), but he says you can use any kind of chicken or pork sausage.  
Ingredients:
(serves 2)
a good way to use up random leftovers 
  • A few strips of bacon
  • 3 chicken sausages (we used Trader Joe’s apple-maple syrup chicken sausage)
  • Butter
  • 1 tsp flour
  • 1/3 lb. haricot verts (green beans)
  • ½ white onion, diced
  • 3–4 oz. white wine
  • Dash of maple syrup (the real stuff)
  • Salt 

Directions: 
  1. Cook the haricot verts, put aside.
  2. Heat a pan on medium heat, add bacon, remove when crispy. Reserve bacon; when you have a free minute, chop the bacon.
  3. Cut the sausages in half lengthwise, place in same pan, cook over medium heat until heated through (or cooked if using raw sausage).
  4. Remove sausage from pan. Make a roux by adding a couple pads of butter (approx. 2–3 tablespoons) to the hot pan, and whisking in 1 tsp. of flour. 
  5. Let the sauce bubble, and when you’re happy with the consistency, add the wine to the pan, scraping up any bits of bacon fat or sausage from the bottom of the pan. Let the sauce simmer for a couple minutes.
  6. Add maple syrup, stir.
  7. Add the onion, let cook for 3–4 minutes, being careful that sauce does not reduce too much. Add salt to taste.
  8. Having chopped up the cooked sausage into bite-size pieces, add it back to the pan, along with the haricot verts.
  9. Stir to thoroughly combine all the ingredients in the pan. Simmer for 3–5 minutes to meld the flavors. Add salt if needed.
  10. Place mixture in bowl or on a plate, and sprinkle with chopped bacon. Bon appétit

Dessert...
Maple Creme Brulee
I have made creme brulee many, many times before and have never had any trouble with it.  Sadly though, this recipe was a failure.  My creme brulee never set properly and therefore was liquid in the center.  We were very disappointed we couldn't eat it.  I'm not quite sure what went wrong.  Since I have never had this problem before, I'm going to blame it on hurricane Sandy and say it was because of the change in atmospheric pressure or something (although, I have never made it with maple syrup, so it could be that too).  So, if you're making creme brulee, don't do it during a hurricane!  
Ingredients:
  • 6 egg yolks
  • 1/4 cup of granulated sugar
  • 1 1/2 cups heavy cream
  • 3/4 tsp maple syrup
  • 6 tsp granulated sugar (for the caramelized tops)

Directions:
  1. Preheat the oven to 300 degrees.
  2. In a medium bowl, whisk together the egg yolks and sugar until the sugar it dissolved and the yolk mixture is thick and light in color.
  3. Add cream and syrup and whisk until blended.
  4. Fill a creme brulee pan halfway with water.  Put the filled ramekins into the water bath.
  5. Bake until the edges are set and the center is still slightly loose, 50-55 minutes.    
  6. Remove from oven and allow to cool.
  7. Put ramekins in the refrigerator for at least 2 hours.
  8. Sprinkle sugar on top and use a torch (or a broiler) to caramelize the sugar.
  9. Enjoy! Hopefully you won't find a liquid center in yours like we did!

Monday, October 22, 2012

An Apple A Day

If an apple a day keeps the doctor away, you won't be seeing the doctor for a long time after this meal!  All the recipes use apples.  They were all delicious and some parts of the meal can be made ahead to save you time. 
Drink...
Starbucks Hot Caramel Apple Cider
*recipe from: Stephanie O'Dea
This is supposed to be a replica of Starbucks cider.  I have never had their cider, so I can't really say how it compares to the original.  I thought it was very good and very easy to make, but it basically just tasted like mulled cider to me.  The best part of this recipe was drinking it out of an apple mug.  All you have to do it slice off the top of an apple.  Then cut a circle around the inside and scoop out the flesh of the apple with a spoon.  Rub lemon juice around the inside of the apple and the rim so it doesn't turn brown (as you can see, I skipped this step and mine started turning brown).  Then, pour the hot cider inside your cute apple cup! :)
Ingredients:
  • 4 cups apple cider
  • 3 tablespoons caramel syrup (the ice cream topping)
  • 1/2 tablespoon ground cinnamon
  • 1/4 teaspoon ground cloves
  • 4 tablespoons sweetened whipped cream (I omitted this)
  • 4 apple mugs
Directions:
  1. Mix all ingredients in a pot.
  2. Cook on low on the stove or in a crock pot for up to 4 hours.
  3. Pour into the apple mugs and enjoy.
Dinner...
Apple Chips and Stuffed Squash
Both components of this meal are simple to make, but take a little bit of time cooking in the oven.  I would make the apple chips ahead of time, so they will be ready to go for dinner.
Apple Chips
*recipe from: The Italian Dish
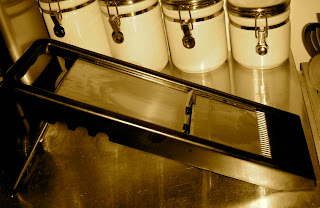
I guess I've never had apple chips before, but they are sooooo good!  This is a recipe I will definitely be making again.  I just wish I had a bigger oven so I could make more at a time.  They take a little while to cook, but require almost no work.  Once they're in the oven, you can almost forget about them!  I purchased a mandolin solely for making these chips and you definitely need it.  There is no way I could have sliced them thin enough otherwise.  And, I'm happy I have the mandolin because now I can make a lot more apple chips (and maybe slice some other fruits and veggies easier)! Check out my new kitchen tool below! :)
Ingredients:
(makes about 25 chips . . . you'll want a lot more!)
  • 1 large Granny Smith apple
  • 2 tablespoons light brown sugar
  • 1 tablespoon cinnamon
Directions:
  1. Preheat the oven to 225 degrees F.  Line 2 baking sheets with parchment paper. (I used greased aluminum foil)
  2. Using a mandolin, slice the apples as thinly as you can.  
  3. Mix the sugar and the cinnamon in a shallow bowl and dip the apple slices lightly in the mixture, just lightly coating them.  
  4. Lay the slices on the baking sheets, about 12 slices per sheet.  
  5. Bake for 1 hour.  
  6. Remove one pan at a time and flip the apple slices over with tongs. When you return pans to oven, also rotate them - put the one that was on the top rack on the bottom.  
  7. Bake for one more hour.  Remove pans from oven. Apple slices will start to harden up pretty quickly.  Remove with tongs. 

Sausage and Apple Stuffed Acorn Squash
*recipe from: Lightlife 
This recipe was REALLY good and was such a great fall dish.  Despite having a lot of apple components, I couldn't really taste much apple in the dinner, but I still highly recommend it.  
Ingredients:
(serves 4)
  • 1 pkg Gimme Lean® Sausage (This is a vegetarian sausage recommended in the original recipe.  I didn't use but instead used Trader Joe's Sweet Apple Chicken Sausage, which goes really well in this dish
  • 2 cups water
  • 3 tbs extra virgin olive oil
  • 1 medium yellow onion, coarsely chopped
  • 6 stalks of celery, chopped fine
  • 1 tsp dried sage
  • 1 tsp dried thyme
  • 8 cups of toasted bread crumbs 
  • 1/2 cup unsweetened applesauce
  • 1 medium apple, diced, any kind
  • 1/3 cup apple cider
  • 2 large acorn squash, cut in half and seeded
  • salt and pepper to taste
Directions:
  1. Preheat oven to 450°. 
  2. Brown sausage in a non-stick skillet sprayed with a little olive oil, breaking it up and crumbling it with a spatula as it browns. Set aside. 
  3. Bring water and olive oil to a boil in a covered pot over high heat. Stir in onion, celery, sage, and thyme. 
  4. Cook, covered, stirring frequently, for 5 minutes. Remove from heat. 
  5. Stir in stuffing cubes, salt and pepper, applesauce, apple cider, apple, and the browned sausage, mixing to combine. Taste for seasoning.
  6. Divide the stuffing evenly among the acorn squash halves. 
  7. Arrange the halves in a roasting pan and pour water around (not on) the squash to 1 inch. 
  8. Spray a piece of aluminum foil large enough to cover the pan with olive oil spray. This will prevent it from sticking to the stuffing. Cover the pan tightly, tending slightly with the sprayed side down. Bake for about 1 1/4 hours, or until the squash is tender when pierced with a fork.  (I took the cover off the squash for about the last 15 minutes of baking to re-toast the stuffing, but it was too long because as you can see, my bread got burnt)
Dessert...

Caramel Apple Parfaits
*recipe from Cinda B
I know I typically say that everything is really good on this blog.  However, I am not joking about this one.  It was decadant and amazing.  This would be a showstopper if you were having a dinner party.  When I was making it, I really was wishing I could just skip a couple steps and start eating.  I was thinking that maybe I could just use store bought caramel instead of making my own, but I am SO glad I didn't, because the homemade caramel was exceptional and was well worth it.  Just please make this.  It doesn't need it, but it would be great with ice cream too.  I topped it with one of the apple chips for a garnish.  This recipe makes a lot (I halved it and there still were almost 4 servings).
Ingredients: 

For the Cake
  • 2 1/2 cups all-purpose flour
  • 1 1/4 teaspoons baking soda
  • 1/2 teaspoon salt
  • 1/2 teaspoon cinnamon
  • 1/3 teaspoon ground cloves
  • 1/2 teaspoon ground allspice
  • 1 stick (4 ounces) unsalted butter, softened
  • 1 1/2 cups packed dark brown sugar
  • 2 tablespoons molasses
  • 1 large egg
  • 1 cup regular yogurt
For the Caramel Sauce

  • 1 cup sugar
  • 1/2 cup water
  • 1 1/4 cups heavy cream
  • 1 1/2 teaspoons cinnamon
For the Apples
  • 1 stick (4 ounces) unsalted butter
  • 8 large Fuji or other crisp apples—peeled, cored and thinly sliced (12 cups)
  • 1/2 cup granulated sugar
  • 1/2 cup packed dark brown sugar
  • 1 quart whipped cream
Directions:
For the Cake:
  1. Preheat oven to 350°.  
  2. Blend flour, baking soda, salt, cinnamon, cloves and allspice in a bowl and set aside.  
  3. In a mixer, blend butter with brown sugar and molasses at medium speed until combined.  
  4. Add in egg and beat till smooth.  
  5. Add dry ingredients in small batches, alternating with yogurt until all is blended together.  
  6. Scrape the batter into a large non-stick baking pan and place on the center rack of over.   Bake for about 20 minutes or until surface springs back easily to touch.  Let cool completely.
For the Caramel Sauce:
  1. In a medium saucepan, stir together sugar and water and cook over high heat until sugar dissolves.  
  2. Stop stirring for about 4 minutes until a deep amber caramel forms.  
  3. Remove from stove and add heavy cream and cinnamon.
  4.  Once the caramel cools slightly place back on burner and continue cooking until the sauce is slightly thickened.  Pour the caramel into a bowl.
For the Apples:
  1. In a skillet, melt 4 tablespoons of the butter.  
  2. Add 6 cups apples and stir over high heat until lightly browned. 
  3. Add half of each of the sugars and continue cooking until the apples become caramelized.  
  4. Pour into a large bowl and set aside, and finish the remaining ingredients exactly the same way.
To Put it all Together:
  1. Cut the cake into 6 inch squares.  
  2. Spoon 2 tablespoons of caramel sauce into dessert cups or parfait glasses.  
  3. Layer 1 tablespoons of apples and 1/2 cup whipped cream to each glass. 
  4. Layer 2 or three cake squares next.  
  5. Repeat with the remaining ingredients, ending with caramel sauce and top with whipped cream.


Saturday, October 13, 2012

California Dreamin'

I lived in Los Angeles for a brief time, and sometimes there are things I miss about it.  While there, I noticed that there definitely is a California-style cuisine.  Typically, it's much healthier and fresher than foods you would find in other parts of the country.  This dinner is composed of things that remind me of that style of eating.  Enjoy!

Drink...
California Lemonade
*recipe from: Bar One Drinks
Now, I have to admit, I never drank anything like this while living in California.  Basically, I couldn't think of a drink that represented The Golden State, so I just chose this because it had the name California in it.  I must say though, it was quite good and refreshing.  It would be perfect on one of those hot summer LA days.  But, beware, it packs a punch!
I altered this recipe slightly because I didn't have all the ingredients.  It was great, but I bet it would be even better with the proper ingredients!
Ingredients:
  • 1/2 oz. Vodka  
  • 1/2 oz. Gin  
  • 1/2 oz. Rum (I didn't add this because I didn't have any)
  • 1/2 oz. Triple Sec  
  • 1/2 oz. Lime Juice  
  • 1/2 oz. Grenadine  
  • Sour Mix (Lemon Juice, Sugar, Water)
Directions:
  1. Make the sour mix by heating 1/4 cup of sugar in 1/4 cup water until it is dissolved.  Then, add 1/2 cup of lemon juice. Stir and let cool.
  2. In a shaker add alcohol, lime juice, dash of grenadine and dash of Sour Mix. Shake well and pour into a highball glass with ice. 
  3. Fill with Sour Mix and float the remaining grenadine on top (you can add extra grenadine for desired sweetness). 
  4. Garnish with a lemon wheel and a cherry. 
Dinner...
California Grilled Veggie Sandwich
*recipe from: All Recipes.com 
This is an old favorite of mine and in my mind it's a perfect representation of California style cuisine.  All of the ingredients are fresh and come together to make a great sandwich.  I have never actually grilled the vegetables on an outdoor grill (I have grilled them on a Forman Grill, which worked well), but I'm sure if you did grill them outdoors, they would be even better.  It also says to grill the sandwich when it is put together, which I am sure would be extraordinary.  I used to put all my cooked veggies on the sandwich and then grill it with the bread in the George Forman grill.  I really liked doing it this way because it presses the sandwich together and makes it almost like a panini.  I no longer have a Forman Grill, so for this one, I didn't do any cooking of the sandwich after putting it together.  I also used to be able to get a really good foccacia bread from the grocery store with tomatoes and onions on top that went perfectly with the veggies.  Now, I could only find plain foccacia bread.  It still tasted great, but it was definitely a downgrade from the other bread.  If I were you, I'd search around for a fancy foccacia bread!
Ingredients:
(makes 4 servings) 
  • 1/4 cup mayonnaise
  • 3 cloves garlic, minced 
  • 1 tablespoon lemon juice
  • 1/8 cup olive oil
  • 1 cup sliced red bell peppers
  • 1 small zucchini, sliced
  • 1 red onion, sliced
  • 1 small yellow squash, sliced
  • 2 (4-x6-inch) focaccia bread pieces, split horizontally
  • 1/2 cup crumbled feta cheese   
Directions:
  1. In a bowl, mix the mayonnaise, minced garlic, and lemon juice. Set aside in the refrigerator.
  2. Preheat the grill for high heat. (or if you aren't using a grill, prepare a pan of a Forman Grill)
  3. Brush vegetables with olive oil on each side. Brush grate with oil. Place bell peppers and zucchini closest to the middle of the grill, and set onion and squash pieces around them. Cook for about 3 minutes, turn, and cook for another 3 minutes. The peppers may take a bit longer. Remove from grill, and set aside.
  4. Spread some of the mayonnaise mixture on the cut sides of the bread, and sprinkle each one with feta cheese. Place on the grill cheese side up, and cover with lid for 2 to 3 minutes. (or press the sandwich in a Forman Grill)  This will warm the bread, and slightly melt the cheese. Watch carefully so the bottoms don't burn. Remove from grill, and layer with the vegetables.
Dessert...
Sprinkles Strawberry Cupcakes
*recipe from: Oprah.com
Sprinkles bakery originated in Beverly Hills, California and is considered to be the first cupcake bakery.  I love a good cupcake and have tried them from a wide variety of bakeries.  Sprinkles is one of my favorites for it's simplicity, freshness, and just the right amount of sweetness.  These cupcakes were not difficult to make and I was obsessed with them!  They were sooooo good, especially the strawberry frosting.  They would be perfect in the summer when strawberries are in season.  The recipe calls for some frozen strawberries, but I used all fresh and it was great!
Ingredients:
(makes 12 cupcakes)
Cakes: 
  • 2/3 cup fresh or frozen whole strawberries (thawed if frozen)
  • 1 1/2 cups all-purpose flour , sifted
  • 1 tsp. baking powder
  • 1/4 tsp. coarse salt
  • 1/4 cup whole milk , room temperature
  • 1 tsp. pure vanilla extract
  • 1/2 cup (1 stick) unsalted butter , room temperature
  • 1 cup sugar
  • 1 large egg , room temperature
  • 2 large egg whites , room temperature 
 Sprinkles Strawberry Frosting: 
  • 1/2 cup frozen whole strawberries
  • 1 cup (2 sticks) unsalted butter, firm and slightly cold
  • pinch coarse salt
  • 3 1/2 cups confectioners sugar, sifted
  • 1/2 tsp vanilla extract 
Directions: 
For the Cakes: 
  1. Preheat oven to 350°. Line a 12-cup muffin tin with cupcake liners; set aside.
  2. Place strawberries in a small food processor; process until pureed. You should have about 1/3 cup of puree. Add a few more strawberries if necessary, or save any extra puree for frosting; set aside.
  3. In a medium bowl, whisk together flour, baking powder and salt; set aside. In a small bowl, mix together milk, vanilla and strawberry puree; set aside.
  4. In the bowl of an electric mixer fitted with the paddle attachment, cream butter on medium-high speed, until light and fluffy. Gradually add sugar and continue to beat until well combined and fluffy. Reduce the mixer speed to medium and slowly add egg and egg whites until just blended.
  5. With the mixer on low, slowly add half the flour mixture; mix until just blended. Add the milk mixture; mix until just blended. Slowly add remaining flour mixture, scraping down sides of the bowl with a spatula, as necessary, until just blended.
  6. Divide batter evenly among prepared muffin cups. Transfer muffin tin to oven and bake until tops are just dry to the touch, 22 to 25 minutes. Transfer muffin tin to a wire rack and let cupcakes cool completely in tin before icing. 
For the Strawberry Frosting: 
  1. Place strawberries in the bowl of a food processor and puree.  
  2. In the bowl of an electric mixer, fitted with the paddle attachment, beat together butter and salt on medium speed until light and fluffy.
  3. Reduce mixer speed and slowly add confectioners sugar; beat until well combined.
  4. Add vanilla and 3 tbs of strawberry puree; mix until just blended.  Do not over mix or frosting will incorporate too much air.  Frosting consistency should be dense and creamy like ice cream.