Search this blog

Saturday, April 21, 2012

Breakfast for Dinner

I love breakfast food, but rarely eat it because who has time to cook breakfast in the morning?  Therefore, breakfast for dinner is always a good choice for me!  These recipes have all of my favorite things involved and they were so good, I would eat them any time of day!
Drink...
Mimosa Punch
*recipe from Tastebook
Mimosas are a classic breakfast drink and these are a delicious amped-up version.  For a little twist on a classic, give this a try!
P.S - This recipe makes a big pitcher/punch bowl of them.  We just made two glasses and estimated the amounts.
Ingredients:
  • 2 quarts of fresh orange juice
  • 1 2-liter bottle of ginger ale (we didn't have this on hand, so we used Diet 7-Up and it worked well)
  • 1/2 cup orange liqueur
  • Orange slices
  • Fresh strawberries, sliced or halved depending on size (We used frozen raspberries because we had them too)
  • 1 (750 ml) bottle chilled dry Champagne or sparkling wine
  • ice cubes
Directions:
  1. Combine orange juice, ginger ale (7-UP), orange liqueur, orange slices and strawberries (raspberries) in a large punch bowl (or a wine glass). 
  2. Cover and refrigerate until chilled, 1-2 hours. Right before serving, add the Champagne and ice. 
  3. Stir to combine and serve immediately.
Dinner...
Peanut Butter and Banana Stuffed French Toast
*recipe from Tasty Comforts of North Georgia
Some of my favorite things are peanut butter, french toast, syrup, and bacon.  This recipe was great because it combined all of them into one perfect meal.  I thoroughly enjoyed every wonderful bite of this meal!
Ingredients:
(Serves 1)
  • 2 slices of bread
  • Peanut butter
  • 1 banana
  • One whole egg whisked together
  • 2 Tbls juice from fresh orange or ready-made OJ
  • pinch of freshly grated nutmeg
  • pinch of cinnamon
  • pinch of cayenne
  • Maple Syrup
Directions:
  1. Make a peanut butter and banana sandwich. 
  2. Whisk egg mixture together. Dip both sides of sandwich in egg mixture. 
  3. Place sandwich in a heated iron skillet or non-stick that has had a small pat of butter melted. Allow to brown for 60 seconds or slightly longer on each side.
  4. For the garnish: pour syrup, add some sliced bananas, and sprinkle powdered sugar.   
Dessert...
Glazed Doughnut Muffins
*recipe from Sweet Pea's Kitchen
I was surprised that these actually did taste like a combination of a doughnut and a muffin.  I overcooked mine, so they were a little dry, but other than that they were scrumptious!
Ingredients:
(makes 12 muffins)
For the Muffins:
  • 1/4 cup butter
  • 1/4 cup vegetable oil
  • 1/2 cup granulated sugar
  • 1/3 cup brown sugar
  • 2 large eggs
  • 1 1/2 teaspoons baking powder
  • 1/4 teaspoon baking soda
  • 3/4 teaspoon ground nutmeg
  • 1 teaspoon cinnamon
  • 3/4 teaspoon salt
  • 1 teaspoon vanilla extract
  • 2 2/3 cups all-purpose flour
  • 1 cup milk
For the Glaze:
  • 3 tablespoons butter; melted
  • 1 cup confectioners’ sugar; sifted
  • 3/4 teaspoon vanilla
  • 2 tablespoons hot water
Directions:
  1. Preheat oven to 425 degrees F. Line 12 muffin cups with muffin liners or spray with nonstick cooking spray.
  2. In the bowl of a stand mixer fitted with the paddle attachment, beat together butter, vegetable oil, and sugars till smooth. Beat in eggs, one at a time. With the mixer on low speed, baking powder, baking soda, nutmeg, cinnamon, salt and vanilla until just combined. Stir the flour into the butter mixture alternately with the milk, beginning and ending with the flour and making sure everything is thoroughly combined.
  3. Spoon batter into cups, filling the cups, and smooth tops. Divide batter equally among prepared muffin cups. Bake until muffin tops are a pale golden and springy to the touch, 15 to 17 minutes, rotating halfway through baking time. Cool muffins in muffin tin for 5 minutes, then transfer to wire rack and cool 10 minutes before glazing.
  4. To make the glaze: in a medium bowl mix together the melted butter, confectioners’ sugar, vanilla and water. Whisk until smooth.
  5. When muffins have cooled slightly, dip the muffin crown into the glaze and allow the glaze to harden. Once hardened, dip a second time  and allow to harden, then serve.

Friday, April 13, 2012

Spring Supper

Spring is here in NYC and we have been trying to take advantage of all the opportunities to be outdoors.  This is a light, delicious Spring dinner - enjoy it indoors or out!
Drink...

Moscato Spritzer 
*recipe from Make It, Bake It, Create It
This is a refreshing Spring drink.  Because it is so sweet, I think it would be perfect for a brunch, a luncheon, or a bridal/baby shower.  
Ingredients:
  • Moscato wine
  • Diet Sprite (I used Diet 7up)
  • Frozen whole raspberries
Directions:
  1. Put a handful of frozen raspberries in the bottom of a wine glass.
  2. Combine equal parts of wine and Sprite (I would suggest using a little less Sprite, since the wine is already really sweet).  
  3. Stir and sip!
Dinner...
Pasta Primavera
*recipe adapted from Mama Grubs Grub
In case you didn't know, Primavera means Spring.  So, this is Spring pasta!  The original recipe uses different veggies than I used (I made it with asparagus, bell peppers, green beans, onion, and tomatoes).  The great thing about this pasta is that you can pretty much put any vegetables into it.  Use whatever you have leftover or whatever is your favorite.
Plus, you can enjoy this dinner while working toward your Summer swimsuit body because it's only 250 calories per serving.  I looked up other recipes and they were higher calories.  You wouldn't know it from tasting this pasta though - it's delicious! (I thought maybe the addition of a little garlic would be good, but I love garlic in everything)
Ingredients: 
All my veggies
  • Linguine (I used whole wheat Rotini)
  • 2 teaspoon olive oil 
  • 1 cup chopped onion 
  • 1/2 teaspoon cracked black pepper 
  • 1 cup chopped organic carrots 
  • Asparagus  
  • 1/2 cup water 
  • 1 organic small red bell pepper,julienned  
  • 1 cup sliced organic mushrooms 
  • 1 cup organic vegetable broth (I used chicken broth) 
  • 2 teaspoon cornstarch 
  • 1/4 cup organic half and half
  • The colors in this pasta are beautiful!
  • 1/4 cup Parmesan
Directions:
  1. Cook the pasta according the package.
  2. Heat the oil in a large saute pan over medium high heat. 
  3. Add the onion and saute for 3 mins or until soft. Add the black pepper.
  4. Add the carrot and asparagus to the pan and saute to coat with seasonings. add the water,cover and allow the veggies to steam for 4 mins or until carrots begin to soften.
  5. Add the red bell pepper and mushrooms and stir. 
  6. Add the broth to the pan. 
  7. Whisk the cornstarch into the half and half, and add to the pan. 
  8. Cook for 4 mins or until the sauce thickens up toss in the pasta stir to coat.
  9. Add the Parmesan cheese to the mix and toss well.
Dessert...
Bird Nest Treats
*recipe adapted from The Curvy Carrot
 These were so easy to make and really cute.  Plus they tasted great.  They are perfect for Spring and would be really great for Easter too.  They include Cadbury Mini Eggs, my other favorite Spring candy (last week I mentioned the other one - Cadbury Cream Eggs).  I took the peanut butter out of the recipe because Doug doesn't like peanut butter (I know, I think the same thing...how could you not like peanut butter???).  They were still great, but would be even better with the peanut butter!
Ingredients:
  • 1 tablespoon of unsalted butter, for greasing the muffin pan (I just sprayed the pan with Pam and it worked well)
  • 6 ounces (1/2 bag) of semi-sweet chocolate chips
  • 6 ounces (1/2 bag) of butterscotch chips
  • 1 cup creamy peanut butter
  • 6 ounces (1/2 of a large bag) of chow mein noodles
  • 36 mini Cadbury Mini eggs
Directions:
My nests in the muffin tin
  1. Generously grease the wells of a muffin pan with the butter (this will help later when you are taking out the chilled nests).  Or, spray it with Pam like me!
  2. In a large microwave-proof bowl, heat the chocolate and butterscotch chips in 30 second intervals until thoroughly melted, stirring after each increment.**It only took me two 30-second intervals.
  3. Once melted, add the peanut butter to the chocolate/butterscotch mixture, mixing well until smooth and completely combined.
  4. Carefully add the chow mein noodles, stirring with a wooden spoon or rubber spatula, until completely coated.
  5. Using a large spoon, mold the mixture into the wells of your muffin tin, indenting the tops slightly with the back of the spoon.
  6. Chill the nests until hardened, about 1 hour or so.
  7. Once chilled, gently remove the nests from the muffin tin.***I used a butter knife as a lever to pop them out-this seemed to work.
  8. Place three eggs (or colored jelly beans!) on the tops of each nest.  (I actually put the eggs in the nest while the chocolate was still melted.  That way, when it hardened, the eggs didn't fall out.)

Monday, April 2, 2012

Easter Lunch

I didn't feel like making a regular ham, which is what most people have for Easter dinner.  So, I decided to try something different and make an Easter lunch.  After seeing the meal all together, I realized that this would not only be great for lunch, but would also be great for Easter leftovers, or a kid's Easter meal.  It turned out to be such a fun, cute meal.  I loved making it and eating it!
Drink...

Caramel Cadbury Egg Martini
*recipe from She Knows Food & Recipes
Easter candy is the best candy.  One of the things I wait for all year is a Cadbury Egg.  I have always loved them and always will.  When I saw this drink I was pretty excited to try my beloved candy in a drink.  This drink was SUPER delicious, but not an original Cadbury Egg flavor.  Maybe one of the Caramel Cadbury Eggs, but I have never had one of those, so I don't really know.  I am a purist when it comes to my chocolate eggs and only eat the original :)  Anyway, it was really good and I kind of detected a Cadbury Egg taste in the aftertaste.  I give it my official seal of approval!
Ingredients:
(makes 1 drink)
  • 1-1/2 ounces Baileys Irish Cream with Caramel (I used Carolan's Irish Cream because it tastes just as good and it's cheaper—no caramel flavor though)
  • 1/2 ounce crème de cacao
  • 1 ounce caramel syrup
  • 1 ounce cream
  • 1/2 tablespoon Hershey’s chocolate syrup, plus extra for rim
Directions:
  1. Drizzle chocolate syrup around inside rim of glass.
  2. Place all ingredients into a cocktail shaker with ice.
  3. Shake until chocolate syrup is completely incorporated.
  4. Strain into glass.
Dinner (Lunch)...
Carrot Sandwiches and Chick Deviled Eggs
Everybody makes Easter dinner or Easter brunch . . . why not try an Easter lunch! 
Cute Chick Deviled Eggs
*egg recipe from AllRecipes.com
I saw these on Pintrest (my new favorite recipe source!) and there was no link to a recipe, just a picture.  You could use any deviled egg recipe you like and make these for a little Easter twist on a classic deviled egg.  The recipe I used was supposedly from a well-known 1970s restaurant in Indiana called the Durbin Inn.  They were a little sweet, but good.
Ingredients: 
(makes 6 eggs)
  • 6 hard-cooked eggs
  • 2 tablespoons mayonnaise
  • 1 teaspoon sugar (maybe less?)
  • 1 teaspoon white vinegar
  • 1 teaspoon prepared mustard (I like mine mustardy, so I added more)
  • 1/2 teaspoon salt
  • Paprika (since the chicks have the white tops on them, I didn't use the paprika)
  • Walnut pieces
  • Carrot pieces
Directions:
  1. Hard boil the eggs.
  2. Slice off the very top of the egg; remove yolks and set whites and tops aside. 
  3. In a small bowl, mash yolks with a fork. Add the mayonnaise, sugar, vinegar, mustard and salt. Mix well. 
  4.  Stuff or pipe into egg whites. 
  5. Top with the egg white tops.
  6. I used walnut pieces for the eyes and carrot pieces for the beak.
  7. Refrigerate until serving.
Easter Bunny's Carrot Sandwiches
*recipe from Hungry Happenings
These are soooo cute looking and soooo easy to make!  Plus, the great thing about them is that you can fill them with just about anything!  I did ham and cheese, but really I wanted to fill them with egg or ham salad.  Unfortunately, Doug doesn't like either of those, but ham and cheese was still really good.  Perfect for that leftover ham or eggs!  
The recipe says to use a cream horn to make the shape, but I didn't have one of those, so I used foil and it worked great.  Another wonderful thing about these is that you can basically make them any size.  I made 2 really big sandwiches, but you could make a bunch of small ones for kids or appetizers.  
Ingredients:
(makes 2 giant carrot sandwiches or lots of small sandwiches)
  • 1 tube Pillsbury Crescent Recipe Creations Crescent Seamless Dough Sheet (I don't know where you get this, so I just bought regular crescent rolls, pushed the seams together, and cut them into strips)
  • 1 egg (whisked with 1 teaspoon of water to make an egg wash)
  • yellow and red liquid food coloring (I happened to have orange food coloring, so that worked even better!)
  • 1 1/2 cups of your favorite egg or ham salad (or chopped ham and fontina cheese like I used)
  • 1 bunch of fresh dill or parsley
Directions: 
(The link to the website has great step by step pictures!)
dough slices
  1. Preheat the oven to 400 degrees.
  2. Unroll the crescent rolls onto a cutting board.  
  3. Use a pizza cutter or a knife to cut the dough lengthwise into 6 equal strips. Brush one strip with egg wash.
  4. Roll the strip into a 17"- 18" long log. I rolled the strip of dough up into a tube and pinched the seam shut. Then I rolled out the dough into a thinner, longer log by pushing and rolling  the log with both hands.
  5. Repeat, brushing egg wash onto each dough strip before rolling each into logs.Create 6 logs.(I made more—oops)
  6. Since I used foil, I sprayed it with olive oil first to make sure the dough didn't stick.  
  7. Wrap one dough log around each cream horn mold (or foil mold), trying to keep the seam side against the metal mold. Repeat. Be sure your dough does not hang over the open end of the cream horn mold, as it will make it difficult to remove once baked. 
  8. Line a baking sheet with non-stick aluminum foil or parchment paper (I sprayed the foil and the foil with olive oil).  Squeeze about 30 drops of yellow food coloring into a small bowl.  Add one or two drops of red.  Stir to create orange.  Brush the orange food coloring all over each carrot shaped dough.  Set carrots on lined baking sheet.
  9. If you don't want to paint your dough with food coloring, you can simply brush them with egg wash.  The carrot will bake up golden brown. 
  10. Bake for 6-8 minutes until golden brown.  I suggest rotating the pan half way through the baking cycle for even browning.  Allow carrot crescents to cool for about 5 minutes.  Carefully remove the cream horn form by holding the carrot in one hand and using the other hand to twist the mold and gently pull it out. 
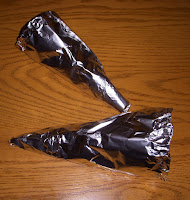
  11. My foil cones
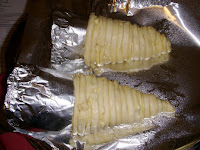
    After wrapping dough around cones
    Fill each Carrot Crescent with egg salad or ham salad.  Press a few sprigs of dill or parsley into the egg salad for a decorative effect.  Your carrots will keep in an airtight container for up to 2 days, but are best served the day they are baked.  Fill your carrots just before serving.  (I baked mine for a little less time to start with, took out the foil, and then filled mine with ham and cheese and baked them for a few more minutes to melt the cheese.)
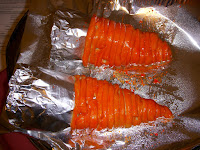
    After adding food coloring
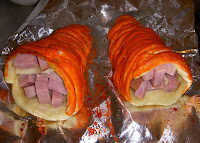
    After stuffing with ham & cheese


Dessert...
Oreo Truffle Eggs
Oreo truffles are such a great dessert and so easy to make.  Whenever I bring them to a party, people comment on how incredibly good they are.  They are shocked when I tell them how simple they are!
I intended for these to be pastel colors, but they turned out more neon.  Hey, bright colors are in this season, so my eggs are stylish!
Ingredients:  
(makes 20-25 depending on size)
  • 1 pkg of oreos
  • 1 8oz pkg cream cheese, softened
  • white chocolate
  • food coloring
Directions:
  1. Crush Oreos into crumbs.  (I do this by putting them in a Ziplock bag and pounding them with kitchen utensils, but it would be WAY easier if you had a food processor)
  2. Mix in the cream cheese until it is kind of a mushy paste.
  3. Form the Oreo/cream cheese mixture into an egg shape.
  4. Dip the mixture into the white chocolate, shake off the extra, and place on wax paper to dry.
  5. Mix food coloring in some of the white chocolate and use a piping bag to decorate.  (If you don't have a piping bag you can use a Ziplock bag with a tiny corner cut off the bottom, or you can just drizzle the colors over the eggs by dipping a fork in the melted chocolate and drizzling.)
  6. Put in the refrigerator for the chocolate to harden.