Search this blog

Monday, February 27, 2012

My Big Secret

Alright, I have a secret to confess . . .
In most places, this secret would not be a big deal at all, but here in Manhattan, I risk becoming an outcast in all my social circles.
For the sake of this blog, I will let my secret out.  Here it is:
I like Olive Garden.
There, it's out.  That wasn't so bad.  I know there are others out there like me, so maybe this will make it easier for them to come clean.  Then, once more people admit it, maybe we could all go out to dinner at Olive Garden to celebrate!
No one in NYC eats at a chain restaurant unless it is a small, NYC only chain, or they are tourists.  So, if you are still too scared to admit your love for chain restaurant food, now you can make it home and eat it secretly in your apartment.
Drink...
Raspberry Lemonade
*recipe from My Baking Addiction
When I go to Olive Garden, I don't typically drink alcoholic beverages (maybe since I haven't been there much since I was old enough to drink).  Usually I order raspberry lemonade.  Their raspberry lemonade is nothing spectacular, and in fact, after doing a little web research, I think theirs is really just Minute Maid raspberry lemonade.  So, I made my own and I think it's even better than Olive Garden's. 
Ingredients:
(makes a pitcher of lemonade)
  • 1 cup sugar
  • 1 cup of water
  • ¾ cup raspberries; pureed and pushed through a fine mesh sieve; plus more whole berries for garnish if desired
  • 1 cup fresh lemon juice (this equaled close to 8 of my lemons)
  • 4-6 cups cold water (this will vary depending on your taste)
Directions:
  1. Make a simple syrup by combining the sugar with 1 cup of water in a saucepan. Place over medium heat and heat until the sugar in completely dissolved; swirl the pan occasionally. Let cool.
  2. Measure 3/4 of fresh raspberries and puree them in your blender or food processor. (I don't have a blender or a food processor, so I just mashed them up with a fork and it worked surprisingly well)
  3. Push the raspberry puree through a fine mesh sieve to separate the seeds from the pulp.
  4. Once the simple syrup has cooled, combine the raspberry puree, simple syrup and lemon juice in a large pitcher.
  5. Add 4-6 cups of cold water. The amount of water you use will depend on your taste, so add as little or as much as you want to achieve your perfect sweet/tart balance. 
Dinner...
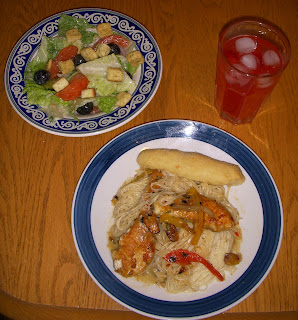
Chicken Scampi with Salad and Breadsticks
This meal was really good.  However, I will say, it was one of the more difficult meals I have made on my blog so far.  The chicken dish is a little involved, but more than anything, it was hard to make all aspects of the meal and have everything ready at the same time.  Those Olive Garden cooks must be good :)

Olive Garden Salad
*recipe from Heritage School House
There is something irresistible about Olive Garden's salad.  I have even made their salad the main part of my meal before by only ordering soup, salad, and breadsticks.  This recipe is not exactly the same, but it's close enough.  I'm pretty excited to be able to make it at home and it's easy!
Ingredients:
(serves 6)
for dressing
  • 1/2 cup mayonnaise
  • 1/3 cup white vinegar
  • 1 teaspoon vegetable oil
  • 2 tablespoons corn syrup
  • 2 tablespoons parmesan cheese
  • 2 tablespoons romano cheese
  • 1/4 teaspoon garlic salt
  • 1/2 teaspoon italian seasoning
  • 1/2 teaspoon parsley flakes
  • 1 tablespoon lemon juice
for salad
  • American blend bagged salad mix
  • red onion slices
  • black olives
  • pepperoncini peppers
  • croutons
  • roma tomatoes, sliced
  • parmesan cheese, freshly grated
Directions:
  1. Mix all dressing ingredients in a blender or processor until well blended. 
  2. Toss salad ingredients and top with dressing.
Olive Garden Breadsticks
 *recipe from Full Bellies, Happy Kids
Even people who say they don't like Olive Garden often will admit, "Well, they do have really good breadsticks."  I know, you're thinking, but Megan . . . you said you would never make bread again!  Well, it seems like that's one of those things that I will keep saying, but not actually do.  There are just so many good bread recipes out there, I can't pass them up!  This was one of my more successful bread attempts.  Doug enjoyed the breadsticks much more than I did, but they were pretty good.  The flavor was consistent with Olive Garden, but the texture was off (mine were a little too dense - not light and fluffy).  
Ingredients:
(makes 10-12 breadsticks)
  • 1 1/2 cups warm water (between 110 - 120 degrees F)
  • 1 package active dry yeast
  • 4 1/4 cups all-purpose flour
  • 2 tablespoons unsalted butter, melted
  • 2 tablespoons sugar
  • 1 tablespoon salt 
For basting:
  • 1 stick unsalted butter (or 1/2 cup margarine)
  • 2 teaspoons garlic powder
  • 2 teaspoons salt
Directions:
  1. In a large bowl, dissolve sugar and yeast in warm water and allow to sit for 10 minutes, covered. Mixture should be frothy.
  2. In separate bowl, combine flour and salt.  
  3. Add flour and salt to yeast mixture. Add melted butter. Mix with paddle attachment of stand mixer or wooden spoon until fully combined. 
  4. Knead dough for a few minutes just until dough is smooth. Do not over-knead!
  5.  Grease a cookie sheet. Pull off pieces of dough and roll out into strips. 
  6. Cover the dough and let sit in a warm place for 45 minutes to an hour.
  7. Preheat your oven to 400 degrees F and once heated, pop in the bread sticks. In microwave, combine the basting ingredients.
  8. After 6 or 7 minutes in the oven, brush the bread sticks with half the butter mixture. 
  9. Then continue to bake. Honestly, I almost never leave them in there for an entire 15 minutes—normally it's closer to 12 because I like them softer and less crisp on the outside, but to each their own. Either way, immediately upon removal from the oven brush the other half of the butter on the breadsticks.
  10. Allow them to cool for a minute or two, and enjoy!    
Chicken Scampi
*recipe from Easy Restaurant Recipes
This is my favorite dishe from Olive Garden and the one I have ordered most often.  When I made it, I was surprised by how similar it tasted to the real thing!
Ingredients:
(makes 5-6 servings)
White Sauce
  • 1 tablespoon butter 
  • 2 tablespoons flour 
  • milk
Scampi Sauce
  • 1 cup (2 sticks) butter
  • 2 tablespoons crushed garlic (real garlic; not salt or the dried stuff)
  • 2 tablespoons chicken stock
  • 3/4 cup Chablis or any white wine that's not too sweet
  • 3/4 cup water
  • 1/4 cup white sauce
  • 1 teaspoon crushed red pepper
  • 2 tablespoons Italian seasoning
  • Black pepper to taste
Other Ingredients
  • 1/2 package angel hair, cooked according to package directions
  • Thinly sliced bell peppers (red, green and yellow)
  • Thinly sliced red onions 
  • 10 whole garlic cloves
  • 2 chicken breasts
Directions:
  1. Start by making the white sauce:  
    1. Heat 1 tablespoon butter in nonstick skillet. 
    2. After it's melted, add 2 tablespoons flour and cook for 2 minutes on medium heat. 
    3. Slowly add milk and stir constantly to get rid of lumps. When you have added enough milk, you should have a white gravy consistency. Set this aside. 
  2.  Put the 10 garlic cloves in a small nonstick skillet with some oil and 
       braise them for about 20 minutes on low heat. Just put the lid on the 
       skillet and let them cook; they should be golden and really soft when 
       they are done. 
  3.  In a large nonstick skillet, sauté the peppers and onions for a few 
       minutes. 
  4.  Sauté chicken tenderloins (I sprinkled mine with salt and pepper and 
       dredged them in flour before cooking).
  5.  Cook the Angel Hair pasta according to the package directions.
  6.  Make the scampi sauce:
         1.  Heat butter over a slow heat. Add the garlic, Italian seasoning 
              and crushed red pepper. Cook for about 2 minutes on low heat. 
         2.  Add the wine, water, and chicken base. Stir until combined. 
         3.  Add the white sauce mix and stir until slightly thickened.
  7.  Add the braised garlic cloves to the sauce.  
  8.  Pour the sauce over the angel hair pasta and chicken.   

Dessert...
Olive Garden Black Tie Mousse Cake 
*recipe from Food.com 
This is an amazing cake!  I had it at Olive Garden and this recipe is a very good copycat.  It may not be the prettiest cake I ever made, but it sure is one of the tastiest!  It is time-consuming to make, but well worth it!
Ingredients:

BOTTOM LAYER

  • 1 (18 ounce) box of ordinary cake mix (devil's food)

SECOND LAYER

  • 1 teaspoon Knox unflavored gelatin
  • 1 tablespoon cold water
  • 2 tablespoons boiling water
  • 4 ounces semi-sweet chocolate chips
  • 4 ounces cream cheese, cubed
  • ¾ cup heavy cream
  • ½ teaspoon granulated sugar

THIRD LAYER

  • 3 egg yolks
  • ¼ cup granulated sugar
  • 3 tablespoons flour
  • 1 teaspoon Knox unflavored gelatin
  • 1 ¾ cups heavy cream
  • 1 teaspoon vanilla extract

FOURTH LAYER

  • 1 ½ cups heavy cream
  • 2 tablespoons butter
  • 18 ounces semi-sweet chocolate chips
  • ½ cup white chocolate chips (optional) 
  • Chocolate frosting to pipe as a border 
Directions: 
There are FOUR layers to make: 

BOTTOM LAYER (cake): 
  1. Bake according to directions on box in a 9" spring form cake pan.
  2. When the cake comes out of the oven use a paper towel to press it with your fingers and flatten the cake a little. This is the bottom layer out of four layers.
SECOND LAYER (the chocolate mousse):
  1. Melt chocolate and cream cheese together. Let cool. 
  2. Soften gelatin with cold water for 1 minute, then add boiling water, stir until dissolved and clear. Let this cool while you start whipping the heavy cream and sugar. 
  3. As cream starts to thicken, add gelatin. Continue to whip until stiff peaks form. 
  4.  Add 1/4 of the cream to the chocolate mixture and mix thoroughly. 
  5. Then fold this into the remaining cream. Once you have it completed, spread this chocolate mousse onto the cake and refrigerate.
THIRD LAYER (the custard):
The first 3 layers
  1. Beat egg yolks until pale. 
  2. Add sugar, flour, and gelatin, then beat until mixed. 
  3. Bring cream and vanilla extract to a boil. 
  4. Add a small amount of cream to egg mixture while stirring. 
  5. Gradually add until all of the cream has been added and then pour entire mixture through a strainer into the pan. 
  6. Continue to cook until custard begins to thicken. 
  7. Cool slightly, then pour on top of the chocolate mousse layer and freeze while getting the fourth layer ready.
FOURTH LAYER (the icing):
Please note: this makes a lot of icing so feel free to halve this part of the recipe (I halved it for mine and it was plenty). 
After the 4th layer is added and it's done
  1. Bring butter and cream to a boil, pour over chocolate and let sit for 5 minutes. 
  2. Stir until smooth. Let cool until it starts to thicken. 
  3. Remove cake from freezer, remove the cheesecake pan collar, then pour some of the icing and use a spatula to spread it evenly across the top and sides of the cake. 
  4. While this is still wet, put chocolate chips onto the side of the cake. (I did not do this because I thought the cake was rich enough)
  5. Optional: Melt half a cup of white chocolate chips (in the microwave) and swirl into the icing if you want yours to look like the picture.
  6. Refrigerate the cake. 
  7. Pipe chocolate frosting around the top as a border.
  8. Serve cold. Delicious!

Tuesday, February 21, 2012

Dinner Fit For A President

Since it was President's Day, I decided to make some of our President's favorite foods.  I was surprised to see how many websites are dedicated to the foods Obama likes, and after a little research, I found some of his favorites.  But first, you might be interested to hear what some of his dislikes are...Do not try to feed the President any mayonnaise, salt and vinegar potato chips, beets, asparagus, or soft drinks.  Instead, you can definitely make him happy with any of the recipes below and whatever your political views, I think you will enjoy this meal!
Drink...
Black Cherry Iced Tea
*recipe adapted from Food and Wine.com
According to the Food and Wine website, "one of Obama's favorite drinks is the hard-to-find, organic Black Forest Berry Honest Tea.  His staff tries to keep bottles on hand, but, in a pinch, he might like this home-made black cherry tea made with green tea leaves."
This tea is great tasting, but very sweet.  I would say it tasted more like juice than tea.  You might want to either add a little water or even a little alcohol to make it less sweet!
Ingredients:
(makes 1 1/4 quarts) 
  • 1 1/4 quarts water
  • 1/2 pound fresh black cherries, pitted, or one 10-ounce bag frozen pitted black cherries, thawed
  • 1/2 cups + 2 tbs sugar
  • 2 tbs fresh lemon juice
  • 1 1/2 whole star anise (I omitted this because I have no idea where it buy it!)
  • 1/4 vanilla bean, split and scraped(I used a splash of vanilla extract)
  •  8 green-tea bags
  • Mint sprigs, for serving 
 Directions:
  1. Bring the water to a boil in a large saucepan. 
  2. Add the black cherries, sugar, lemon juice, star anise and the vanilla bean with its seeds. 
  3.  Simmer the cherries over low heat for 15 minutes, crushing them against the side of the pan with a wooden spoon. 
  4. Remove the cherries from the heat, cover and let stand for 1 hour.
  5. Strain the cherry juice through a fine sieve into a clean saucepan, pressing on the solids. Discard the solids. 
  6. Bring the cherry juice to a boil over moderate heat. 
  7. Remove from the heat, add the tea bags and let steep for 5 minutes. 
  8. Discard the tea bags and let cool to room temperature. 
  9. Transfer the cherry tea to a large pitcher and refrigerate until chilled or for up to 2 days. 
  10. Serve the tea over ice, garnished with mint sprigs. 
Dinner...
Obama Family Chili 
*recipe from iVillage.com 
According to the website above, Obama says, "I have been using this chili recipe since college and would bring it to any potluck.  I can't reveal all the secrets, but if you make it right, it's got just the right amount of bite, the right amount of oomph in it, and it will clear your sinuses." 
I would agree with the president that this chili is tasty, but I apparently did not "make it right" because there was no spice to it!  If you like any spice in your chili at all, add something to it, because this doesn't have any!
Ingredients:
(serves 5-6)
  • 1 large onion, chopped  
  • 1/4 tsp ground basil  
  • 1 green pepper, chopped  
  • 1 tbsp chili powder 
  •  several cloves of garlic, chopped 
  •  3 tbsp red wine vinegar  
  • 1 tbsp olive oil  
  • 1 can red kidney beans  
  • 1 pound ground turkey or beef 
  • several tomatoes, depending on size, chopped 
  •  1/4 tsp ground cumin  
  • 1/4 tsp ground turmeric
  • shredded cheddar cheese (for garnish)  
  • 1/4 tsp ground oregano sour cream (for garnish)  
Directions:   
  1. Saute onions, green pepper, and garlic in olive oil until soft. 
  2. Add ground meat and brown.
  3. Combine spices together into a mixture, then add to ground meat.
  4. Add red-wine vinegar and tomatoes and let simmer until the tomatoes cook down. 
  5. Add kidney beans and cook for a few more minutes.
  6. Serve over white or brown rice. 
  7. Garnish with grated cheddar cheese, onions, and sour cream.
Dessert...
Sweet Potato Pie
*recipe from iVillage.com
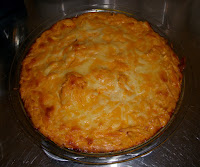
 iVillage.com says, "It's no secret that President Obama loves pie. During his Presidential campaign, pundits began counting the number of times he said "pie" during a speech (his record was 15 times in 104 seconds). He has proclaimed sweet potato pie as his favorite on many occasions, mentioning it in the following speech:" “We decided to stop at a diner because I was hungry and I decided I wanted some pie. Pie. That’s what I wanted. ... I like sweet potato pie. I'm thinking of having a sweet potato pie here in Philadelphia. Because I've heard a lot of people are saying they can make sweet potato pie. I'll put it up against my mother in law's sweet potato pie.”
-- President Barack Obama, October 2008
I had never had sweet potato pie, so I was a little nervous.  If you haven't had it either, it pretty much tastes just like pumpkin pie.  Delicious and surprisingly easy to make (if you use my shortcuts.)
Ingredients:
  • flour (for pie crust)  
  • 1/4 cup sugar 1 tsp salt (for pie crust)  
  • 1 tsp sugar (for pie crust)  
  • 1/2 cup plus 1 tbsp very cold water (for pie crust)
  • 3/4 cup brown sugar  
  • 1 tsp cinnamon  
  • 1 tsp ginger  
  • 4 eggs 
  •  1/4 tsp orange zest  
  • 2 cups sweet potato puree 
  •  pinch of salt  
  • 1 1/2 cups heavy cream 
  • whipped cream
Directions:
  1. I'm sure Obama likes his pie crust home-made, but if you want to make it even easier, be like me and buy a frozen pie crust and skip to step 2.  Otherwise, the recipe calls for this "easy" pie crust: 
    1. Place the dry ingredients in a food processor and pulse 4 or 5 times.
    2. Add the butter and pulse just until small pebbles form.
    3. Add the ice water and pulse just until a crumbly dough comes together. If needed, add 1 Tablespoon of water at a time until the dough forms.
    4. Remove from the food processor (carefully?) and form a flat disc. Wrap in plastic and refrigerate for 1 hour (or 20 minutes in the freezer).
    5. Roll your dough in a shape 2” larger than your pie pan. Using the rolling pin, pick up and gently lay the dough into the pan. Cut, crimp or use the tines of a fork to create a decorative edge.
    6. Bake blind (with pie weights) at 350 degrees Fahrenheit until golden on the edges, or fill according to your favorite recipe and follow its instructions.
    2. For the filling: Using a large bowl and whisk, beat the eggs with 
        the salt.  
    3. Add the remaining ingredients and whisk thoroughly.
    4. Remove the pie weights from your baked pie crust (or take out 
        your  frozen pie crust). 
    5. Pour the filling into the pie tin and bake pie at 375 degrees
        Fahrenheit for 35 minutes. (20 minutes for smaller pies), or until       
        the center is ‘set’.  (mine took a lot longer - about 45-50 minutes)


Monday, February 13, 2012

A Dinner With Your Valentine

I love fondue.  And I love crème brûlée.  And for some reason, both of these foods seem romantic to me.  I know, you're thinking . . . fondue, I could never make that!  Crème brûlée, certainly I could never make that!  Well, guess what . . . you can!  These two things might seem difficult to make, but they are actually two of the easiest recipes I have blogged about so far.  Not only are they easy, but they are sure to be so delicious that they will trick your valentine into thinking you are a gourmet chef.  :)
Drink...
Kir Royale
Champagne is a great Valentine's Day drink.  This is a classic cocktail with champagne and crème de cassis, a blackcurrant liqueur.  In France, it is usually drunk as an apéritif (before dinner).  We decided to drink some before and during dinner.  It was really good and went well with the meal.
Ingredients:
(for 1 drink)
  • 1/2 shot of crème de cassis
  • 4-5 shots of champagne (I preferred more champagne since the crème de cassis is very sweet)
Directions (order of steps is important):
  1. Pour the crème de cassis into a champagne glass.
  2. Add the champagne and drink!

Dinner...

I LOVE, LOVE, LOVE fondue!  What's not to love?  Coating everything you eat in melted cheese cannot be bad.  But, I not only love the taste of fondue, I also love the experience of eating fondue.  Usually our meals are so fast.  We eat quickly and then shortly thereafter leave the table.  However, fondue forces you to slow down and enjoy everything.  This is a fondue recipe from my mom and it's a classic fondue recipe.  I am sure you could use other types of cheese, but I just love the classic Swiss!
Classic Swiss Fondue (AKA "Mom's Fondue")
*recipe from Maureen K.
Ingredients:
(serves 2)
  • 3/4 lb of Swiss cheese
  • 2 1/4 tbs flour
  • 1 clove of garlic
  • 1 1/2 cups of white wine (we used Chablis which works well in the fondue and is also a traditional wine for Kir [the drink we made, but with white wine instead of champagne—the champagne is what makes it "royal"]
  • 3/4 tbs lemon juice
  • 1 tsp nutmeg
  • dash of pepper
  • Dipping ingredients (We used bread, apples, and garlic chicken sausage. You could use so many different things!)
Directions:
  1. Cut the cheese into cubes.
  2. Toss the cheese with flour in a bag.
  3. Rub the fondue pot with the garlic clove.
  4. Pour the wine into a pot and set to medium heat.
  5. When the wine simmers, add lemon juice and cheese, stirring constantly.
  6. Bring the cheese to a bubble, then add nutmeg and pepper.
  7. Put the mixture into a fondue pot if you have one.  If not, you can eat it out of the pot in which it was cooked.  It should stay hot long enough for you to eat!
Dessert...
Crème Brûlée
*recipe from Chicago Metallic 
This is one of my favorite desserts.  Before I knew how to make it, I thought it would be very complicated, but as it turns out, it is ridiculously simple!  My parents knew about my love of this dessert and gave me a crème brûlée set a few years ago.  So, I actually have a torch to caramelize the sugar on top.  However, the recipe says you can just put the ramekins no less than 5 inches under the broiler to caramelize it if you don't have a torch. It's good with fresh berries on top as well.
Ingredients:
(serves 4)
  • 6 egg yolks
  • 1/4 cup granulated sugar
  • 1 1/2 cups of heavy cream
  • 3/4 tsp vanilla extract
  • 6 tsp granulated sugar (for the caramelized tops)

Directions:

Before Baking
  1. Preheat the oven to 300 degrees.
  2. In a medium bowl, whisk egg yolks and sugar together until the sugar is dissolved and the egg yolk mixture is thick and light in color.
  3. Add cream and vanilla extract and whisk until blended.
  4. Fill a baking pan a little less than halfway with water.  
  5. Pour the brûlée mixture into ramekins and place the ramekins into the water bath.
  6. Bake until the edges are set, but the center is still slightly loose, about 50-55 minutes.
  7. Remove the pan from the oven and cool.  
  8. Remove the ramekins from the pan and refrigerate for at least 2 hours.
  9. Before serving, sprinkle 1 1/2 tsps of sugar on top of each and torch until the sugar is caramelized.

Torching - the scary part!
After a couple bites


Monday, February 6, 2012

Superbowl Supper!

One of my favorite things about the Superbowl is the good food you get to eat while you watch it!  Most of these recipes can also be made ahead of time.  Then, when it's game time all you have to do it heat them up!
Drink...
Michelada 
I wanted to serve a beer cocktail for this meal because let's face it...the best thing to drink during the Superbowl is beer!  However, I did not want to just say open, pour, and drink, so I began my search for a beer cocktail.  I found some that sounded pretty good, but they seemed a little too fancy for the Superbowl.  One drink that repeatedly popped up during my search was a Michelada.  I took a look at the ingredients and though it sounded disgusting.  However, it kept showing up and getting good reviews.  Then, Doug read an article praising this drink in one of his beer books, so I thought, "Hey, everyone seems to like it, so let's give it a try!"  Well, that was a mistake because while some people may like them, Doug and I apparently are NOT Michelada people!  I would love to hear from you if you do enjoy Micheladas...maybe you could tell us something we were doing wrong?  Anyway, here's the recipe...many people seem to like them...it's just not for me.
Ingredients:
  • 12 oz beer (we used Pacifico, but I think Corona would be better) 
  • juice of 1 lime
  • 2 dashes Worcestershire sauce 
  • 1 dash soy sauce (We didn't use this.  It just sounded too strange) 
  • 1 dash hot sauce 
  • 1 pinch black pepper 
  • salt
Directions:
  1. Rim a glass with salt.
  2. Mix ingredients in a tall high glass with lots of ice. 
  3. Add beer, mix, and serve.
Dinner...
This is not a traditional dinner.  It's more like delicious Superbowl snacks!  While the Micheladas may not have been a hit in our house, these certainly were (at least with me)!
Buffalo Chicken Dip
*recipe from allrecipes.com
I originally tasted this recipe when my friend Ashley L. made it for our work Thanksgiving party.  Everyone loved it and I thought it would be a perfect Superbowl snack.  I changed a couple of things in the recipe to meet my personal tastes. 
Ingredients:
(serves 10-15)
  • 1 chicken breast, shredded (the original recipe called for canned chicken, but that weirded me out a bit, so I used a chicken breast.  I also learned a new, easy way to shred chicken.  I cooked the chicken by par-boiling it in a pan with 1 1/2 cups of water.  After it was cooked and cooled I shredded it with my hands.  I found this to be a lot easier than cooking the chicken other ways and then shredding it.) 
  • 2 (8 ounce) packages cream cheese, softened
  • 3/4 cup blue cheese dressing (the original recipe said to use ranch, but I like to eat my buffalo chicken with blue cheese...so you could use either.  Doug doesn't like blue cheese so I tried to sneak this in without him knowing, but you really can taste it and he noticed it while he was eating.  I like the flavor, but if you don't, do not use it because you can taste it.)
  • 3/4 cup hot sauce (This made mine really spicy, so you might want to use less.  I don't know if mine was spicy because of the amount, or because I used a little of Doug's extra hot sauce mixed in with the regular hot sauce.)
  • 1 1/2 cups shredded Cheddar cheese
  • tortilla chips (the recipes said to serve with celery [eew] and crackers, but I liked the tortilla chips)
Directions:
  1. Heat chicken and hot sauce in a skillet over medium heat, until heated through. 
  2. Stir in cream cheese and blue cheese dressing. Cook, stirring until well blended and warm. 
  3. Mix in half of the shredded cheese, and transfer the mixture to a casserole dish. 
  4. Sprinkle the remaining cheese over the top.  You can refrigerate the casserole until game time, or make it right away.
  5. Bake at 350 degrees for 20-35 minutes (depending on if you are cooking it right away or after it has been cooled in the refrigerator) until hot and bubbly. 
  6. After my dip came out of the oven
  7. Serve with tortilla chips. 


 Blue Cheese Stuffed Bacon Sliders
*recipe from Burger Bar
This recipe is from Chef Hubert Keller.  He owns the restaurant Burger Bar in Las Vegas and has written a book by the same name.  I have seen him on TV where he hosts a show on PBS and his burgers always look so good.  Now that I have tried one, I can honestly say they are so good!  
I was unsure of how these ingredients would taste together, but they were great!  It's a little different too because the cheese is stuffed inside the burger, so it's a pleasant surprise when you bit into it!
Ingredients: 
(serves 4)
  • 8 slices apple-smoked bacon
  • 1 ripe but firm pear
  • About 1/2 tablespoon sugar
  • 1.5 pounds coarsely ground sirloin, chilled
  • 1/2 tablespoon finely chopped fresh thyme
  • Freshly ground black pepper
  • 3 ounces (about 1/4 cup) crumbled blue cheese, at room temperature (Doug doesn't like blue cheese so I stuffed his with a shredded 3-cheese blend)
  • salt
  • 12 soft, mini burger buns
  • 1 1/4 cups baby arugula leaves
  • 1/2 small red onion (about the same diameter as the buns), very thinly sliced
  • 1 pint basket cherry tomatoes (optional) 
Directions:

Stuffed burgers before adding the top layer
After the top layer is on and the cheese is nestled inside
  1. In a large skillet over medium heat, cook the bacon until crispy, and then drain on paper towels. Cut 4 of the slices crosswise into 3 pieces each; crumble the remaining bacon and set both aside separately.
  2. Peel the pears, halve them lengthwise, and core them. Cut them crosswise into thin slices and put in a bowl. Toss with the sugar and set aside.
  3. In a large bowl, combine the meat, thyme, crumbled bacon, and 11/2 teaspoons pepper. Using your hands, knead together lightly. Form the mixture into 24 evenly sized balls (about 1 ounce each). 
  4. Make a small depression in half the patties. Fill them with a little mound of cheese, dividing it evenly among them. Top with the remaining patties, and then pinch them together around the cheese. Make sure the stuffing is completely enclosed. Pat and mold the burgers to fit the buns. The burgers can be shaped and refrigerated, covered, for several hours or overnight.  (Make sure you really pinch them together tightly around the cheese.  I thought I did mine pretty thoroughly, but I still had some cheese leakage when I cooked them.)
  5. When ready to cook, generously season the meat on both sides with salt and pepper.
  6. Cook the burgers in a skillet, in batches, turning once or twice, about 3 minutes for medium-rare. Do not press down on the patties. Be gentle when you turn the burgers so they do not break open. With a large spoon, baste the sliders several times with the fat in the pan.
  7. When the burgers are done, remove them to a warm platter, keep warm, and let rest for several minutes. 
  8. Meanwhile, heat a half teaspoon of olive oil in a nonstick skillet over medium heat and add the pear slices. Turn and repeat, then remove to a plate. They should still be crunchy.
  9. To build the burgers, arrange a few leaves of arugula on the bun bottoms. Top each with a pear slice or two, a piece of bacon, and a burger. Add an onion slice and a bun top, and skewer securely together. Add a cherry tomato as a topknot, if you wish, on the skewer. Serve immediately. 
Dessert...
Football Cake Pops
These were a touchdown! :)
Ingredients:
  • 1 chocolate cake mix and the ingredients called for on the box to make the cake
  • 1 can of vanilla frosting
  • 1 1/2 bags of milk chocolate chips
  • lolipop sticks
Directions:
My cake, the crumbs, and the frosting.
The cake crumbs mixed with frosting.
The cake shaped into little footballs.
  1. Bake the cake according to the directions on the box.
  2. After the cake cools, crumble 3/4 of it into crumbs.
  3. Mix in 1/2 to 3/4 of the vanilla frosting.  You want the cake crumbs just moist enough so they can be formed into balls.
  4. Form the cake crumb/frosting mixture into football shapes.
  5. Place the football shapes in the freezer for 10-15 minutes.
  6. Melt the chocolate chips.
  7. Dip the end of a lollipop stick into the melted chocolate and insert it halfway into the football.
  8. Dip the entire football into the melted chocolate and tap slightly to allow the excess chocolate to drip off.
  9. Allow the football to dry.  (I got a cool cake pop stand for xmas that helps with this process - thanks mom and dad :)
  10. When the chocolate has hardened (you can put them in the fridge to speed up this process) use a piping bag to pipe vanilla frosting on the footballs for the laces.


Wednesday, February 1, 2012

Veggie Delight

I am not a vegetarian, but there are many vegetarian-friendly dishes I enjoy eating and making.  This meal is so good it's sure to please all your vegetarian and meat-eating friends!
Drink...
The Swamp
Typically I don't drink things with vegetables in them, but this drink not only has vegetables, but it tastes wonderful!
This creation was inspired by a drink from one of our favorite bars in L.A, Seven Grand.  The drink is called "The Swamp."  I am not a whiskey fan, but this drink is from a whiskey bar and therefore has whiskey in it.  However, it doesn't have a strong whiskey taste and I love it! 
I never got the exact recipe for the drink from the bar, but I did my best to replicate it here.  I think I did a pretty good job!  I love this drink because it tastes so light and refreshing.  It's great for summer, but I would drink it any time of year!
Ingredients:
  • Whiskey
  • Ginger Ale
  • Cucumber, chopped
  • Mint leaves
  • Sugar
  • Lemon Juice
Directions:
  1. Muddle together the mint leaves, cucumber, and sugar.  (I dont have a mortar and pestle, so I just put the mint, sugar, and cucumber in a glass and mushed them up with the wide, blunt end of a kitchen utensil)
  2. Put the muddled mixture into a glass with ice.
  3. Pour 1.5 oz (1 shot) of whiskey into the glass. 
  4. Add 3-4.5 oz (2-3 shots) of ginger ale, to taste.
  5. Add a splash of lemon juice.
  6. Stir and enjoy!
Dinner...
California Veggie Sandwich & Oven Fries 
Simple, but delicious!  This recipe is great anytime of year and is a good change of pace from the dinners I typically make.

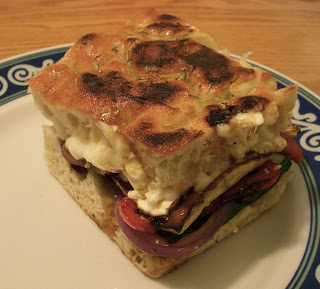
California Veggie Sandwich
*recipe adapted from allrecipes.com
Yum!  This sandwich has it all...delicious veggies, foccacia bread, and cheese!  These vegetables work really well in it, but I am sure you could substitute with other vegetables.
Ingredients:
(makes 4 sandwiches)
  • 1/4 cup of mayonnaise
  • 3 cloves of garlic, minced
  • 1 tbs. lemon juice
  • 1 cup sliced red bell pepper
  • 1 small zucchini, sliced
  • 1 red onion, sliced
  • 1 small yellow squash, sliced
  • 1 loaf of foccacia bread (I used Trader Joe's this time, but many grocery stores have really good ones with herbs and tomatoes on top which I have used.  Those are even better if you can find them!)
  • 1/2 cup crumbled Feta cheese
  • olive oil and rosemary for the foccacia (if yours doesn't already have herbs on it)
Directions:
The sandwiches before smooshing
  1. In a bowl, mix the mayo, garlic, and lemon juice.  Set aside in the refrigerator.
  2. Heat up a skillet and saute the veggies until they are cooked.  (The original recipe says to grill the veggies, which I think would be even better.  Too bad I don't have a grill here in NYC :(
  3. Slice the foccacia bread horizontally and then divide into quarters to make 4 sandwiches.  
  4. Spray olive oil on the bread and sprinkle with rosemary if it doesn't already have herbs on it. *see my product endorsement below :)
  5. Spread the mayo mixture on the cut side of the bread.
  6. Sprinkle with Feta cheese.
  7. Layer the cooked veggies on top of the cheese.
  8. Put the other slice of bread on top and place the sandwich in a heated skillet.  Put something heavy on top of the sandwiches (the bottom of another pan with something heavy inside of it works well) in order to smoosh them down and melt the cheese.  I used to put the sandwiches in my Forman Grill and put the lid down on them.  That worked great, but I don't have a Forman Grill anymore.
  9. After they have heated up and the cheese begins to soften, they are ready to eat!
Great Product...
I usually don't talk about what specific products or appliances I use, but I got something new for Christmas and thought it was worth mentioning.  It is called a Misto.  All it does is spray olive oil, but it it very helpful and saves a lot of olive oil.  It is great for food that needs a coating of oil or for coating a pan.  Also, I find my olive oil lasts a lot longer when I use it because it uses a lot less than if you just pour the oil.  I used the Misto a lot in this recipe.  I sprayed the pan and veggies with it before cooking them.   I also sprayed the top of the Foccacia bread before I sprinkled on the rosemary.  Finally, I sprayed my pan and potatoes with it before I put them in the oven.
You can buy it on Amazon or other websites.  But I have also seen it at TJ Maxx and wouldn't be surprised if they have it at Bed Bath and Beyond.


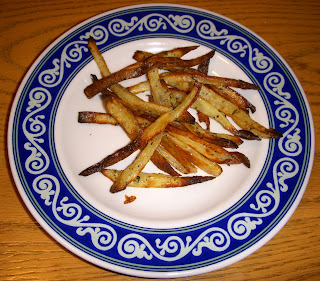
Oven Fries
These fries were okay and they were healthier than typical french fries.  However, no oven-baked fry can beat a traditional fried french fry.  I seasoned mine with garlic salt and parsley, but you could season them with anything...the possibilities are endless!
Ingredients:
(serves 4)
  • 2 potatoes, sliced into thin, long strips (I like my fries thin, but you could cut them thick if you prefer.  Just make sure to adjust the baking time)
  • olive oil
  • garlic salt
  • parsley
Directions:
  1. Heat the oven to 400 degrees.
  2. Spray the pan with olive oil to prevent the fries from sticking.
  3. Spread the sliced potatoes out onto the pan.
  4. Spray the potatoes with olive oil and sprinkle with garlic salt and parsley.
  5. Bake for 40-60 minutes or until fries are golden brown,  turning the fries over halfway through baking.

Dessert...

Garden Party Cupcakes
*recipe adapted from Hello, Cupcake!
What could go better with a vegetarian dinner than a veggie garden for dessert?  I know I say this about everything, but seriously...these are so easy to make and they are soooo cute!!  The most time consuming part is making the veggies, but the time is well worth it.  I usually try to make the cake and frosting from scratch, but this time I was feeling lazy and used a box mix for the cake and pre-made frosting.  Oh well, it was still good!
Ingredients:
  • 1 box of cake mix and ingredients called for on the box.  (I used Trader Joe's Vanilla cake mix and I would not recommend it.  Duncan Hines and Betty Crocker are much better.)
  • Chocolate frosting
  • vanilla frosting
  • Oreo crumbs
  • fondant
  • 2 graham crackers
  • toothpics
  • icing colors
  • edible markers
  • cupcake liners
Directions:
  1. Bake the cupcakes according to the directions on the box.
  2. After the cupcakes cool, cover them with chocolate frosting.
  3. Dip the frosting into the cookie crumbs to coat the tops of the cupcakes.
  4. Break each graham cracker into 2 pieces.
  5. Ice the graham cracker pieces with vanilla frosting.
  6. Use the chocolate frosting and a piping bag to write the words Radishes, Peas, Carrots, and Lettuce on the graham crackers.
  7. Dye a small amount of fondant orange and form into small carrots for the top of the cupcakes and the sign.
  8. Roll some white fondant into the shape of radishes and use a red edible marker to color the tops of the radishes.
  9. Dye some fondant green.  Form the fondant into balls for peas and flat, long pieces for the peapods.  
  10. Use the remaining green fondant to make the lettuce.  Roll a small ball for the middle of the lettuce head.  Flatten small pieces of fondant and put 6-8 of those pieces (leaves) around the center ball to form the lettuce head.
  11.  Place the vegetables on each cupcake.
  12. Color some of the vanilla icing with green food coloring and use a piping bag to add leaves to the radishes, vines to the peas, and tops to the carrots.
  13. Put two toothpicks into a cupcake and lean one of the veggie signs against it.
  14. Repeat for the other three signs.